參考網站
參考網站
參考網站
參考網站
參考網站
最近前端離不開 typescript 後,我將原本用 javascript 撰寫的 mock server 改用 typescript 來撰寫;本篇就來記錄一下該如何使用 typescript 建立 node.js 的 Express!
使用 typescript 的好處
typescript 是為了彌補 javascript 不足的地方而誕生的語言,最主要的差別就在於宣告變數或是執行函數時需要指定 type ,不過這篇的重點在於在 node.js 中使用 typescript 建立 Express,所以就不描述太多 typescript 的特性了。
- 提供許多 OO pattern 的方法,如介面、繼承與抽象類別
- 強型別,能夠在編譯過程中先行找到一些錯誤
- 能夠編譯成不同版本的 JS
- 有 Declaration files 能夠使用 JS Library,因此不太需要擔心套件相容問題,像是 express 有 @type/express
建立 typescript 環境
進入初始化專案或現有專案的目錄
1
2
3
4
| cd ~/project/node-express-project
# 初始化專案
# npm init
|
安裝 typescript 與 express
1
2
| npm install --save-dev typescript @types/express @types/node
npm install --save express
|
設定 typescript
安裝 typescript 時,也會同時安裝將 typescript 編譯成 javascript 的編譯器 - tsc。
初始化 tsc
tsc --init 後會產生 tsconfig.json,當 typescript 透過 tsc 編譯成 javascript 時,就會遵循該檔案的設定進行編譯。
可能遇到的錯誤
這個 error message ,請先在 global 安裝 typescript。
1
| npm install -g typescript
|
若仍出現 “tsc command not found”,請在終端機輸入:
1
| export PATH=”$PATH:/Users/{user name}/.npm-global/lib/node_modules/typescript/bin/”
|
再輸入 tsc -v ,確認 tsc 的版本即可。
tsconfig.json
 1
 2
 3
 4
 5
 6
 7
 8
 9
10
11
| {
"compilerOptions": {
"target": "es5", // 選擇要編譯成哪種版本的 javascript
"module": "commonjs",
"strict": true, // 嚴格模式,啟用後需要指定函數參數的 type
"esModuleInterop": true,
"skipLibCheck": true,
"forceConsistentCasingInFileNames": true,
"outDir": "dist" // 將編譯過後的 js 檔放到 dist 資料夾中
}
}
|
官網有 tsconfig.json 所有屬性的說明,請參考官網。
node.js 的設定
安裝完 typescript 環境後,接著我們來設定 node.js 的部分。
1. 新增入口檔案
1
2
3
| mkdir src
touch src/app.ts # 入口檔案
|
src/app.ts
 1
 2
 3
 4
 5
 6
 7
 8
 9
10
11
12
13
| import express from 'express';
const app = express();
const port = 3000;
app.get('/', (req, res) => {
res.send('The server is working!');
});
app.listen(port, () => {
if (port === 3000) {
console.log('true')
}
console.log(`server is listening on ${port} !!!`);
});
|
2. 安裝 nodemon 與 ts-node
- nodemon: 用於在每次儲存檔案後自動重啟 node,看到即時的修正。
- ts-node: 可以當作 node.js + typescript,用於直接在 node.js 執行 typescript 檔案。
在專案資料夾內安裝:
1
| npm install --save-dev nodemon ts-node
|
【推薦】也可以直接安裝於全域環境:
1
| npm install -g nodemon ts-node
|
3. 調整 package.json 的 scripts
package.json
1
2
3
4
5
| "scripts": {
"start": "nodemon src/app.ts",
"build": "tsc --project ./",
"test": "echo \"Error: no test specified\" && exit 1"
}
|
4. 執行 npm start
start 後,nodemon 會監聽檔案是否有儲存的動作,並用 ts-node 來重啟。

npm run build 後則會出現一個 dist 資料夾來存放編譯過後的 js 檔。
BONUS: 使用自定義的 tsconfig.json
補充一下,若當前專案包含前後端,而前端也使用 typescript 撰寫時,已經有一隻前端部分的 tsconfig.json,此時若需拆分 Express 的 tsconfig.json,可以透過 nodemon 的參數 --config {express tsconfig.json 檔案位置} 來調整。
- 先複製一份 tsconfig.json 到 Express src 資料夾內
1
2
| # 先複製一份 tsconfig.json
copy tsconfig.json src/tsconfig.json
|
- 調整 start 的 scripts
package.json
1
2
3
4
5
| "scripts": {
"start": "nodemon src/app.ts --config src/tsconfig.json",
"build": "tsc --project ./ --config src/tsconfig.json",
"test": "echo \"Error: no test specified\" && exit 1"
}
|
使用 http
這邊講解用 http module 寫 node.js,如需直接使用 express 可以直接跳到使用 Express。
建立完 typescript 的環境後,引入 node.js 的核心套件之一:http module。 http module 能讓你建立一個 http server,當你的 code 在執行的時候,可以隨時監聽網路上發送到你 url 的所有 request,並將你寫的程式邏輯 response 回去。
載入 http module 其實跟 javascript 的寫法差不多,只是在 request 和 response 加上對應的型別: IncomingMessage、ServerResponse。
PS: 在 node 無法直接使用 import,得透過 Babel 轉譯,可以在 tsconfig.json 中設定 module。
src/tsconfig.json
 1
 2
 3
 4
 5
 6
 7
 8
 9
10
11
12
13
14
15
16
17
18
19
20
21
22
23
24
25
26
27
28
29
30
31
| {
"compilerOptions": {
"target": "esnext",
"module": "CommonJS", // 重點是這行
"useDefineForClassFields": true,
"strict": true,
"jsx": "preserve",
"outDir": "./dist",
"importHelpers": true,
"moduleResolution": "node",
"experimentalDecorators": true,
"allowJs": true,
"skipLibCheck": true,
"esModuleInterop": true,
"allowSyntheticDefaultImports": true,
"sourceMap": true,
"isolatedModules": false,
"resolveJsonModule": true,
"baseUrl": ".",
"types": ["node"],
"paths": {
"@/*": ["src/*"]
},
"lib": ["esnext", "dom", "dom.iterable", "scripthost"],
"noFallthroughCasesInSwitch": true,
"forceConsistentCasingInFileNames": true,
"typeRoots": ["node_modules/@types", "src/types", "src"],
"suppressImplicitAnyIndexErrors": true
},
"include": ["**/*.ts", "**/*.d.ts"]
}
|
src/app.ts
 1
 2
 3
 4
 5
 6
 7
 8
 9
10
11
12
13
14
| import { createServer, IncomingMessage, ServerResponse } from 'http';
const port = 5000;
const server = createServer((request: IncomingMessage, response: ServerResponse) => {
response.on('error', (err) => {
console.error(err);
});
response.writeHead(200, {"Content-Type": "text/plain"});
response.end('Hello world!');
});
server.listen(port);
console.log(`server is running on http://localhost:${port}`)
|
如此一來每當有任何 client 對 http://localhost:5000 這個 url 發送 request 時,我們的 server 都會回應 “Hello world!” 給該 client。

取得 request 中的資料
取得 request body
大部分的時候,如果我們需要傳資料到 server,會發送 POST request ,並且將資料存在 body 當中,要在 node.js 取得 request 中的 body data 方法如下:
 1
 2
 3
 4
 5
 6
 7
 8
 9
10
11
12
| let body = [];
request
.on('error', (err) => {
console.error(err);
})
.on('data', (chunk) => {
body.push(chunk);
})
.on('end', () => {
body = Buffer.concat(body).toString();
console.log(body);
})
|
如果直接將 chunk console.log 出來會發現是一段看不懂的資料:<Buffer 7b 0d 0a 20 20 20 20 22 74 65 73 74 22 3a 20 22 35 22 0d 0a 7d>,這是因為 http request 在發送給 server 的時候是按照順序一個 byte、一個 byte 以資料流的方式發送的,因此需要用 Buffer.toString() 轉換回原本的資料。
當我使用 POST method 發送 request 時,我的 server 端就會印出 request 中 body 的資料。


直接用 request.headers 取得 request 中的基本資料:
1
2
3
4
5
6
7
| request
.on('error', (err) => {
console.error(err);
})
.on('end', () => {
console.log(request.headers);
})
|


取得 request authorization
authorization 是我們習慣放置 token 的欄位,雖然在 postman 中是獨立的一欄,但事實上是存在 request 的 headers 裡的。
1
2
3
4
5
6
7
8
| request
.on('error', (err) => {
console.error(err);
})
.on('end', () => {
console.log(request.headers);
console.log(request.headers.authorization);
})
|


完整程式碼
src/app.ts
 1
 2
 3
 4
 5
 6
 7
 8
 9
10
11
12
13
14
15
16
17
18
19
20
21
22
23
24
25
26
27
28
29
| import { createServer, IncomingMessage, ServerResponse } from 'http';
const port = 5000;
const server = createServer((request: IncomingMessage, response: ServerResponse) => {
const { headers, method, url } = request;
let body:any = [];
request
.on('error', (err) => {
console.error(err);
})
.on('data', (chunk) => {
body.push(chunk);
})
.on('end', () => {
body = Buffer.concat(body).toString();
console.log(body);
console.log(request.headers);
console.log(request.headers.authorization);
})
response.on('error', (err) => {
console.error(err);
});
response.writeHead(200, {"Content-Type": "text/plain"});
response.end('Hello world!');
});
server.listen(port);
console.log(`server is running on http://localhost:${port}`)
|
使用 Express
接著使用 Express 來改寫一下。
src/app.ts
 1
 2
 3
 4
 5
 6
 7
 8
 9
10
11
12
13
14
15
16
17
18
19
20
21
22
23
24
25
26
27
28
29
30
| import express, { Express, Request, Response } from 'express';
const port = 5000;
const app: Express = express();
app.get('/', (request: Request, response: Response) => {
response.type('text/plain');
response.send('Homepage');
})
app.get('/articles', (request: Request, response: Response) => {
response.type('text/plain');
response.send('All articles are here!');
})
app.get('/about-me', (request: Request, response: Response) => {
response.type('text/plain');
response.send('My name is Jimmy.');
})
app.use((request: Request, response: Response) => {
response.type('text/plain');
response.status(404)
response.send('Page is not found.');
})
app.listen(port, () => {
console.log(`server is running on http://localhost:${port}`)}
);
|
加入 Route 與 Controller
當專案越長越大後,將所有 routes 和邏輯都寫在 app.ts 是個很難維護的做法,因此大多數的專案都會將 routes 和 controllers 獨立出來,把商業邏輯寫在 controllers 中。
- Controller: 請求經過 router 分配過後,會交由 controller 負責處理商業邏輯,並回傳對應的 response。
- Route: 我們要將使用者的請求,依照其進入的 Url 分配給不同的 Controller。
Controller
建立 controllers。
src/controllers/api-controllers.ts
 1
 2
 3
 4
 5
 6
 7
 8
 9
10
11
12
13
| import { Request, Response, NextFunction } from 'express';
export class ApiControllers {
getHomePage(request: Request, response: Response, next: NextFunction) {
response.type('text/plain');
response.send('Homepage');
}
getAboutPage(request: Request, response: Response, next: NextFunction) {
response.type('text/plain');
response.send('My name is Jimmy.');
}
}
|
Route
建立 routes。
src/routes/api-routes.ts
 1
 2
 3
 4
 5
 6
 7
 8
 9
10
11
12
13
14
15
16
17
18
| import express, { Router, Request, Response, NextFunction } from 'express';
import { ApiControllers } from '../controllers/api-controllers';
const apiControllers = new ApiControllers;
export class ApiRouter {
router: Router;
constructor() {
this.router = express.Router();
this.initializeRoutes();
}
initializeRoutes() {
this.router.get('/', apiControllers.getHomePage);
this.router.get('/articles', apiControllers.getArticlesPage);
this.router.get('/about-me', apiControllers.getAboutPage)
}
}
|
調整 src/app.ts
src/app.ts
 1
 2
 3
 4
 5
 6
 7
 8
 9
10
11
12
13
14
15
16
17
18
19
20
21
22
23
24
25
26
27
28
29
30
| import express, { Express, Request, Response, NextFunction } from 'express';
import { ApiRouter } from './routes/api-routes';
const port = 5000;
const app: Express = express();
const apiRouter = new ApiRouter;
app.use((request: Request, response: Response, next: NextFunction) => {
response.setHeader("Access-Control-Allow-Origin", "*");
response.setHeader(
"Access-Control-Allow-Headers",
"Origin, X-Requested-With, Content-Type, Accept, Authorization"
);
response.setHeader("Access-Control-Allow-Methods", "GET, POST, PATCH, DELETE");
next();
});
app.use('', apiRouter.router)
app.use((request: Request, response: Response) => {
response.type('text/plain');
response.status(404)
response.send('Page is not found.');
})
app.listen(port, () => {
console.log(`server is running on http://localhost:${port}`)}
);
|
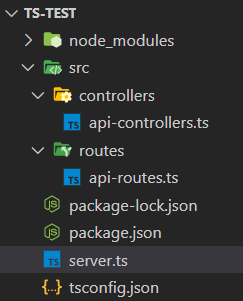
檔案結構:
將 routes 拆分成多個檔案
- 先建立一個 route 的 abstract class
src/routes/route.ts
 1
 2
 3
 4
 5
 6
 7
 8
 9
10
11
12
| import { Router } from "express";
abstract class Route {
protected router = Router();
protected abstract setRoutes(): void;
public getRouter() {
return this.router;
}
}
export default Route;
|
- 新增 AuthRoute 與 AuthController
src/controllers/AuthController.ts
 1
 2
 3
 4
 5
 6
 7
 8
 9
10
| import { Request, Response } from "express";
class AuthController {
echo(request: Request, response: Response, next: NextFunction) {
response.type('text/plain');
response.send('echo');
}
}
export default AuthController;
|
src/routes/auth.route.ts
 1
 2
 3
 4
 5
 6
 7
 8
 9
10
11
12
13
14
15
16
17
| import AuthController from "../controllers/AuthController"
import Route from "./route";
class AuthRoute extends Route{
private authController = new AuthController();
constructor() {
super();
this.setRoutes();
}
protected setRoutes() {
this.router.get('/login', this.authController.echo);
}
}
export default AuthRoute;
|
- 新增 ArticleRoute 與 ArticleController
src/controllers/ArticalController.ts
 1
 2
 3
 4
 5
 6
 7
 8
 9
10
| import { Request, Response } from "express";
class ArticleController {
getArticlesPage(request: Request, response: Response, next: NextFunction) {
response.type('text/plain');
response.send('All articles are here!');
}
}
export default ArticleController;
|
src/routes/article.route.ts
 1
 2
 3
 4
 5
 6
 7
 8
 9
10
11
12
13
14
15
16
17
| import ArticalController from "../controllers/ArticalController"
import Route from "./route";
class ArticleRoute extends Route{
private articalController = new ArticalController();
constructor() {
super();
this.setRoutes();
}
protected setRoutes() {
this.router.get('/articles', this.articalController.getArticlesPage);
}
}
export default ArticleRoute;
|
- 建立 router 並加載各個檔案的 route
移除原先的 src/routes/api-routes.ts,統一改成使用 src/routes/router.ts。
src/routes/router.ts
1
2
3
4
5
6
7
8
| import Route from "./route";
import AuthRoute from "./auth.route";
import ArticleRoute from "./article.route";
export const router: Array<Route> = [
new AuthRoute(),
new ArticleRoute()
]
|
- 改寫 src/app.ts
src/app.ts
 1
 2
 3
 4
 5
 6
 7
 8
 9
10
11
12
13
14
| import express from 'express';
import { router } from "./routes/router";
const app: express.Application = express();
app.use(express.json());
app.use(express.urlencoded({ extended: false }));
// load router
for (const route of router) {
app.use(route.getRouter());
}
module.exports = app;
|
前綴 Prefix
同一個 route 檔案常常會有相同的 prefix url,例如說 auth route 可能會有:
- POST auth/login
- POST auth/logout
- POST auth/forgetPassword
- …
- 我們在 Route class 中加入一個新的資料成員
prefix,用來設定每個 route 的前綴網址:
src/routes/route.ts
 1
 2
 3
 4
 5
 6
 7
 8
 9
10
11
12
13
14
15
16
17
18
19
|
import { Router } from "express";

abstract class Route {
  protected router = Router();
  protected abstract setRoutes(): void;
  protected prefix: string = '/';

  public getRouter() {
    return this.router;
  }

  public getPrefix() {
    return this.prefix;
  }
}

export default Route;
|
- 在各個 Route 的建構子中修改它:
src/routes/auth.route.ts
 1
 2
 3
 4
 5
 6
 7
 8
 9
10
11
12
13
14
15
16
17
18
| import AuthController from "../controllers/AuthController"
import Route from "./route";
class AuthRoute extends Route{
private authController = new AuthController();
constructor() {
super();
this.prefix = '/auth';
this.setRoutes();
}
protected setRoutes() {
this.router.get('/login', this.authController.echo);
}
}
export default AuthRoute;
|
src/routes/article.route.ts
 1
 2
 3
 4
 5
 6
 7
 8
 9
10
11
12
13
14
15
16
17
18
| import ArticalController from "../controllers/ArticalController"
import Route from "./route";
class ArticleRoute extends Route{
private articalController = new ArticalController();
constructor() {
super();
this.prefix = '/articles';
this.setRoutes();
}
protected setRoutes() {
this.router.get('/articles', this.articalController.getArticlesPage);
}
}
export default ArticleRoute;
|
- 最後,在 app.ts 中,載入 router 時加入 prefix 的設定:
src/app.ts
 1
 2
 3
 4
 5
 6
 7
 8
 9
10
11
12
13
14
| import express from 'express';
import { router } from "./routes/router";
const app: express.Application = express();
app.use(express.json());
app.use(express.urlencoded({ extended: false }));
// load router
for (const route of router) {
app.use(route.getPrefix(), route.getRouter());
}
module.exports = app;
|
如此一來,原本是 /login 的 url,在加上 prefix 之後,就會變成 /auth/login,而其他在 AuthRoute 定義的 url 也都會變成 /auth/*、在 ArticleRoute 定義的 url 也都會變成 /articles/*。
Middleware
在 Express 中,有三種可以嵌套 middleware 的方式:
- 應用到單一 url
- 應用到單一 route 檔案
- 全域使用,每個請求都會經過這個 middleware
我們先寫一個簡單的 middleware,他只看請求的 header 裡面有沒有 Authorization,若沒有的話會回傳 status code 401:
src/middleware/AuthMiddleware.ts
1
2
3
4
5
6
7
8
9
| import { Request, Response, NextFunction } from "express";
export function AuthMiddleware(req: Request, res: Response, next: NextFunction) {
if (!req.header('Authorization')) {
return res.status(401).send('unauthorized');
}
next();
}
|
套用在單一 url
若你想套用在單一 url,只需要放在 router.METHOD 的第二個參數即可:
src/routes/auth.route.ts
 1
 2
 3
 4
 5
 6
 7
 8
 9
10
11
12
13
14
15
16
17
18
19
| import AuthController from "../controllers/AuthController"
import AuthMiddleware from "../middleware/AuthMiddleware"
import Route from "./route";
class AuthRoute extends Route{
private authController = new AuthController();
constructor() {
super();
this.prefix = '/auth';
this.setRoutes();
}
protected setRoutes() {
this.router.get('/login', AuthMiddleware, this.authController.echo);
}
}
export default AuthRoute;
|
套用在單一 route 檔案
套用在單一 route 檔案,則在該 route class 的建構子加入 (必須在 setRoutes() 之前):
src/routes/auth.route.ts
 1
 2
 3
 4
 5
 6
 7
 8
 9
10
11
12
13
14
15
16
17
18
19
20
| import AuthController from "../controllers/AuthController"
import AuthMiddleware from "../middleware/AuthMiddleware"
import Route from "./route";
class AuthRoute extends Route{
private authController = new AuthController();
constructor() {
super();
this.prefix = '/auth';
this.router.use(AuthMiddleware); // 必須在 setRoutes() 之前
this.setRoutes();
}
protected setRoutes() {
this.router.get('/login', this.authController.echo);
}
}
export default AuthRoute;
|
全域使用
全域使用的話,就在 app.ts 裡面加上:
src/app.ts
 1
 2
 3
 4
 5
 6
 7
 8
 9
10
11
12
13
14
15
16
| import express from 'express';
import { router } from "./routes/router";
import AuthMiddleware from "../middleware/AuthMiddleware"
const app: express.Application = express();
app.use(express.json());
app.use(express.urlencoded({ extended: false }));
app.use(AuthMiddleware);
// load router
for (const route of router) {
app.use(route.getPrefix(), route.getRouter());
}
module.exports = app;
|
Validator
若要驗證 Request body 或 query string 的內容,建議可以使用 express-validator 套件,裡面有各式各樣的驗證用 middleware 可供使用。
1
| npm install express-validator @types/express-validator
|
假設我們的登入表單需要有 username 和 password 兩個欄位,且最少要有四個字。
- 我們能夠將這個驗證寫成 request 檔案:
src/requests/AuthRequest.ts
1
2
3
4
5
6
7
8
| import { check } from "express-validator";
import { showApiError } from "../middleware/AuthMiddleware";
export const loginRequest = [
check('username').exists().isLength({min: 4}),
check('password').exists().isLength({min: 4}),
showApiError
];
|
- 改寫 AuthMiddleware :
src/middleware/AuthMiddleware.ts
 1
 2
 3
 4
 5
 6
 7
 8
 9
10
11
| import { Request, Response, NextFunction } from "express";
import { validationResult } from "express-validator";
export function showApiError(req: Request, res: Response, next: NextFunction) {
const errors = validationResult(req);
if (!errors.isEmpty()) {
return res.status(400).json({ errors: errors.array() });
}
next();
}
|
showApiError 是為了在有 input 錯誤發生時,能夠回傳對應的錯誤訊息而使用的 middleware,如果沒有它的話,validator 不會回傳錯誤訊息。
- 接著我們在 auth route class 裡面載入這個 request:
src/routes/auth.route.ts
 1
 2
 3
 4
 5
 6
 7
 8
 9
10
11
12
13
14
15
16
17
18
19
| import AuthController from "../controllers/AuthController";
import Route from "./route";
import { loginRequest } from "../requests/AuthRequest";
class AuthRoute extends Route{
private authController = new AuthController();
constructor() {
super();
this.prefix = '/auth';
this.setRoutes();
}
protected setRoutes() {
this.router.get('/login', loginRequest, this.authController.echo);
}
}
export default AuthRoute;
|
如此一來 POST /login 的請求就會驗證 request body,當我的 username 輸入太短時,會得到以下錯誤:
 1
 2
 3
 4
 5
 6
 7
 8
 9
10
| {
"errors": [
{
"value": "123",
"msg": "Invalid value",
"param": "username",
"location": "body"
}
]
}
|
因為 request 其實就是 middleware 的陣列,因此若要嵌套其他 middleware 時,使用 Array merge 即可。
