參考網站
參考網站
參考網站
前言
VScode 使用者一定會安裝各種 Extension 來建立一個適合自己的開發環境,而這些強大的 Extension 大部分都由世界各地的愛用者開發並發布(publish) ,一切都是為了要讓 VSCode 更加實用上手甚至美觀。
這篇就是要分享如何建立並發佈一個 Extension,英文程度不錯的建議直接閱讀官方文件,會有更加詳細的解說
開發環境配置
在開始前,請照下方指示正確設置自己的環境。
確認已安裝 nodejs 與 npm
如未安裝兩者,請先至 Nodejs 官方網站 下載。npm 會隨著 nodejs 下載一併被安裝,有時候您可能使用過舊的 npm,這時您可以使用以下指令更新它到最新版。
1
| npm install -g npm@latest
|
如果正確安裝了以上兩者,會跳出兩行版本號資訊。
export:
安裝 yoman

Yoman 是一款流行已久的code generator,可以允許我們使用yoman設置專案的樣板,
並讓我們使用 yo 指令快速產生樣板專案。

VSCode 官方已經發布了 VSCode Yoman 專案,並且定期更新,因此我們可以直接使用 yo 指令產生 VSCode Extension,無需手動開發 yoman 樣板。
請使用以下指令安裝yoman與VSCode Extension Generator:
1
| npm install -g yo generator-code
|
安裝 yoman 後,再次使用版本號指令確認有無正確安裝:
使用 yo 快速產生第一個 Extension 專案
首先,於 terminal 進入一個要放置專案的資料夾後,使用指令:
generator 會跳出提示,讓我們選擇要產生的 extension 種類:

這些 Extension 選項的描述與說明如下:
| Extension 選項 | 描述 |
|---|
| New Extension(Typescript) | 產生使用typescript開發的extension專案 |
| New Extension(Javascript) | 產生使用javascript開發的extension專案 |
| New Color Theme | 配置VSCode介面顏色的擴充套件專案(詳見: Color Theme) |
| New Language Support | 程式語言(Programming Languages)擴充套件 |
| New Code Snippets | 程式碼片段擴充套件 |
| New Keymap | 快捷鍵擴充套件,keymap讓使用者得以在vscode中使用vim、sublime等等不同編輯器的快捷鍵開發。 |
| New Extension Pack | 打包多個已發佈的extension,讓使用者一鍵快速安裝。 |
| New Language Pack (Localization) | 配置VSCode編輯器多國語氣的擴充套件。 |
我們依序輸入如下:
What type of extension do you want to create?
選擇你要建立的專案類型
這邊我選擇第一個 New Extension(Typescript) 選項
What’s the name of your extension?
Extension 名稱: 對應到 package.json “displayName”
這裡我輸入: wconvert
What’s the identifier of your extension?
識別碼:對應到 package.json “name”
這裡我輸入: wconvert
What’s the description of your extension?
描述: 對應到 package.json “description”
這裡我輸入: my first vscode extension practice.
Initialize a git repository?
是否要使用 git
Bundle the source code with webpack?
是否要使用 webpack 做原始碼的 bundle
Which package manager to use?
要使用哪個套件管理工具

讓子彈飛一會兒,最後 generator 會詢問是否使用 vscode 打開,這邊選擇打開。

Extension 專案重點相關檔案介紹
打開後,我們會看到一個 nodejs 的 typescript 專案,結構如下:

1
2
3
4
5
6
7
8
9
10
11
12
13
14
15
16
17
18
19
20
21
22
| ├── .vscode
│ ├── extensions.json
│ ├── launch.json
│ ├── settings.json
│ └── tasks.json
├── node_modules
├── src
│ ├── extension.ts
│ └── test
│ ├── runTest.ts
│ └── suite
│ ├── extension.test.ts
│ └── index.ts
├── .eslintrc.json
├── .gitignore
├── .vscodeignore
├── CHANGELOG.md
├── README.md
├── package-lock.json
├── package.json
├── tsconfig.json
└── vsc-extension-quickstart.md
|
| 檔案名稱 | 說明 |
|---|
| task.json | 設定 defaultBuild Task,用於 compile extension 專案的 typescript 程式。 |
| launch.json | 配置 debug mode 的兩個選項:Run extension 與 Test extension,用於執行 extension 主程式與相關測試程式,程式執行前,會先執行 defulat buildTask。 |
| settings.json | extension 專案的設定檔,此處的設定會覆蓋 user settings 跟 default settings。 |
| extensions.json | 設定用於輔助 extension 專案安裝的 extension recommendations list,此處推薦安裝 eslint extension。 |
- src/extensions.ts: 主程式檔案
- src/test.ts: 測試程式檔案
- .eslintrc.json: 用於 extension 專案的 eslint 設置
- .vscodeignore: 用於忽略不打包進發布套件的專案檔案
- tsconfig.json: 用於專案 ts compiler 的設定選項
- package.json: 用於配置 node 相關依賴與相關 npm script,在 extension 專案裡,package.json 亦用於配置 extension 重要相關設定 (詳見: Extension Manifest)
- vsc-extension-quickstart.md: 產生的 extension 專案的 markdown 說明文件
Extension 專案程式簡介
讓我們打開 extension.ts 吧,打開後可以看見 extension.ts 裡面有個 active function 跟 deactive function。

active function 為 extension 程式的進入點。當 extension 被 active 事件啟動時,即會執行 extension 程式。
因此我們可以查看 pakcage.json,package.json 配置了 activeEvents 清單,可以看到清單裡列出跟active 有關的設定 activationEvents。
package.json
1
2
3
4
5
6
7
| {
// ...
"activationEvents": [
"onCommand:wconvert.helloWorld"
],
// ...
}
|
activationEvents 指定了一個 hello world command,此即是說,當使用者執行 hello world command 時,extension 即會活躍並執行 active function。
此處的 onCommand 語法為:
1
| onCommand: ${commandId}
|
那麼,command 的 id 是在哪裡配置的呢?
一樣是在 package.json 裡,我們可以到 contributes 屬性 (Contribution Point: 詳見 Contribution Point) 下面查看:
package.json
1
2
3
4
5
6
7
8
9
10
11
12
| {
// ...
"contributes": {
"commands": [
{
"command": "wconvert.helloWorld",
"title": "Hello World"
}
]
},
// ...
}
|
可以看到在 contrubutes 屬性下面已經配置了 commands 清單,裡面條列著一個 command 設定,此處 command 設定的語法為:
1
2
3
4
5
6
7
| {
/**
* 被產生的Command會預設使用extension的id作為namespace,亦可自訂其他Namespace名稱
*/
"command": ${自定義的command-id},
"title": ${Command的標題內容}
}
|
當我們使用 Command Palette (Cmd/Ctrl + Shift + P) 搜尋 Command 並執行時,是使用 Command 的 Title 搜尋。
好,現在我們已經了解如何在 Contribution Point 設定簡單的 Command id 跟 title,以及設定它為活躍 extension 的 event。現在回到 extension.ts 的 active function 吧!
1
2
3
4
5
6
7
8
9
10
11
12
13
14
15
16
17
| export function activate(context: vscode.ExtensionContext) {
// Use the console to output diagnostic information (console.log) and errors (console.error)
// This line of code will only be executed once when your extension is activated
console.log('Congratulations, your extension "wconvert" is now active!');
// The command has been defined in the package.json file
// Now provide the implementation of the command with registerCommand
// The commandId parameter must match the command field in package.json
let disposable = vscode.commands.registerCommand('wconvert.helloWorld', () => {
// The code you place here will be executed every time your command is executed
// Display a message box to the user
vscode.window.showInformationMessage('Hello World from wconvert!');
});
context.subscriptions.push(disposable);
}
|
我們可以看到,active function 裡面在 extenions 活躍後將註冊我們在 Contribution Point 那邊設定的 command id,並且有一個 callback 函式,當我們配置的 command 執行之後,即會在 vscode 裡跳出顯示「Hello World from day05-first-command!」的訊息。
這個註冊過後的 command 函式 (disposable) 會再 push 進 extension context 裡面,如此當 extension 被關閉後,VSCode 就可以自動釋放 listen 這個 command 的相關資源。
執行 extension 專案應用程式
讓我們來執行 extension 吧,vscode 專案已經幫我們配置好了 lanunch.json,因此我們可以在 debug mode 裡執行 extension。讓我們點開「Run and Debug」,再點擊 sidebar 上方的 Run Extension 旁的執行按鈕開始 extension 吧!(此處的快捷鍵為 F5)
執行後,vscode 會開啟一個新的 vscode 的 window 視窗,window 視窗上的 title 會註明這個視窗為 [Extension Development Host] 並預設載入 extension 了,我們可以在這個視窗操作我們開發中的 extension,並且使用中斷點偵錯。
檢查已被註冊的 command
先來檢查一下剛才註冊的 command,在 Contribution Point 裡宣告的 Command,一樣在 Keyboard Shortcuts 下方可以搜尋的到。從 Manager > Keyboard Shortcuts 進入 Keyboard Shortcuts 頁中,並在搜尋條上輸入 wconvert,使用 extension id 來列出剛才註冊的 command。
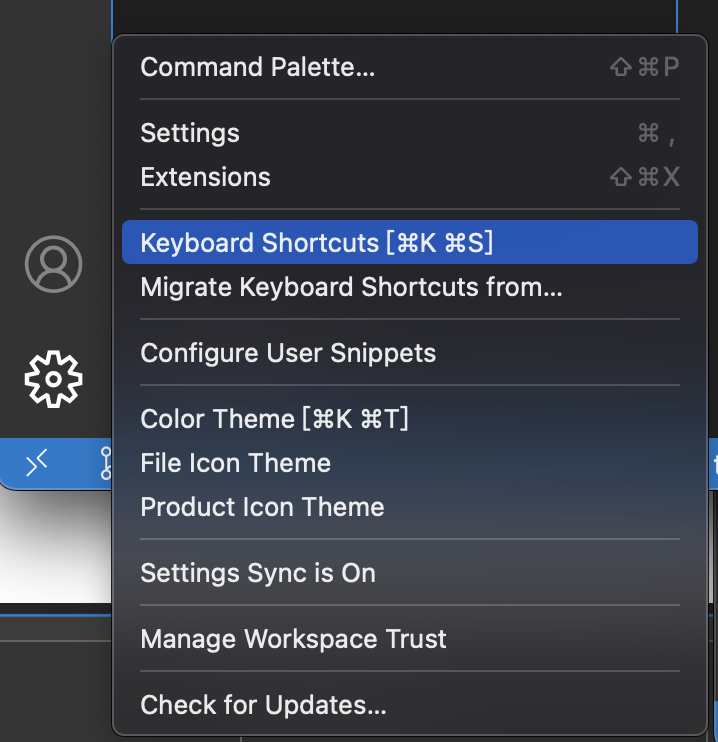

輸入後我們可以看到,Command 已正確被註冊。
執行註冊後的 Command
現在,我們打開 Command Palette (快捷鍵:Cmd/Ctrl + Shift + P),輸入 hello world,使用註冊的 Command Title 查找到 command。
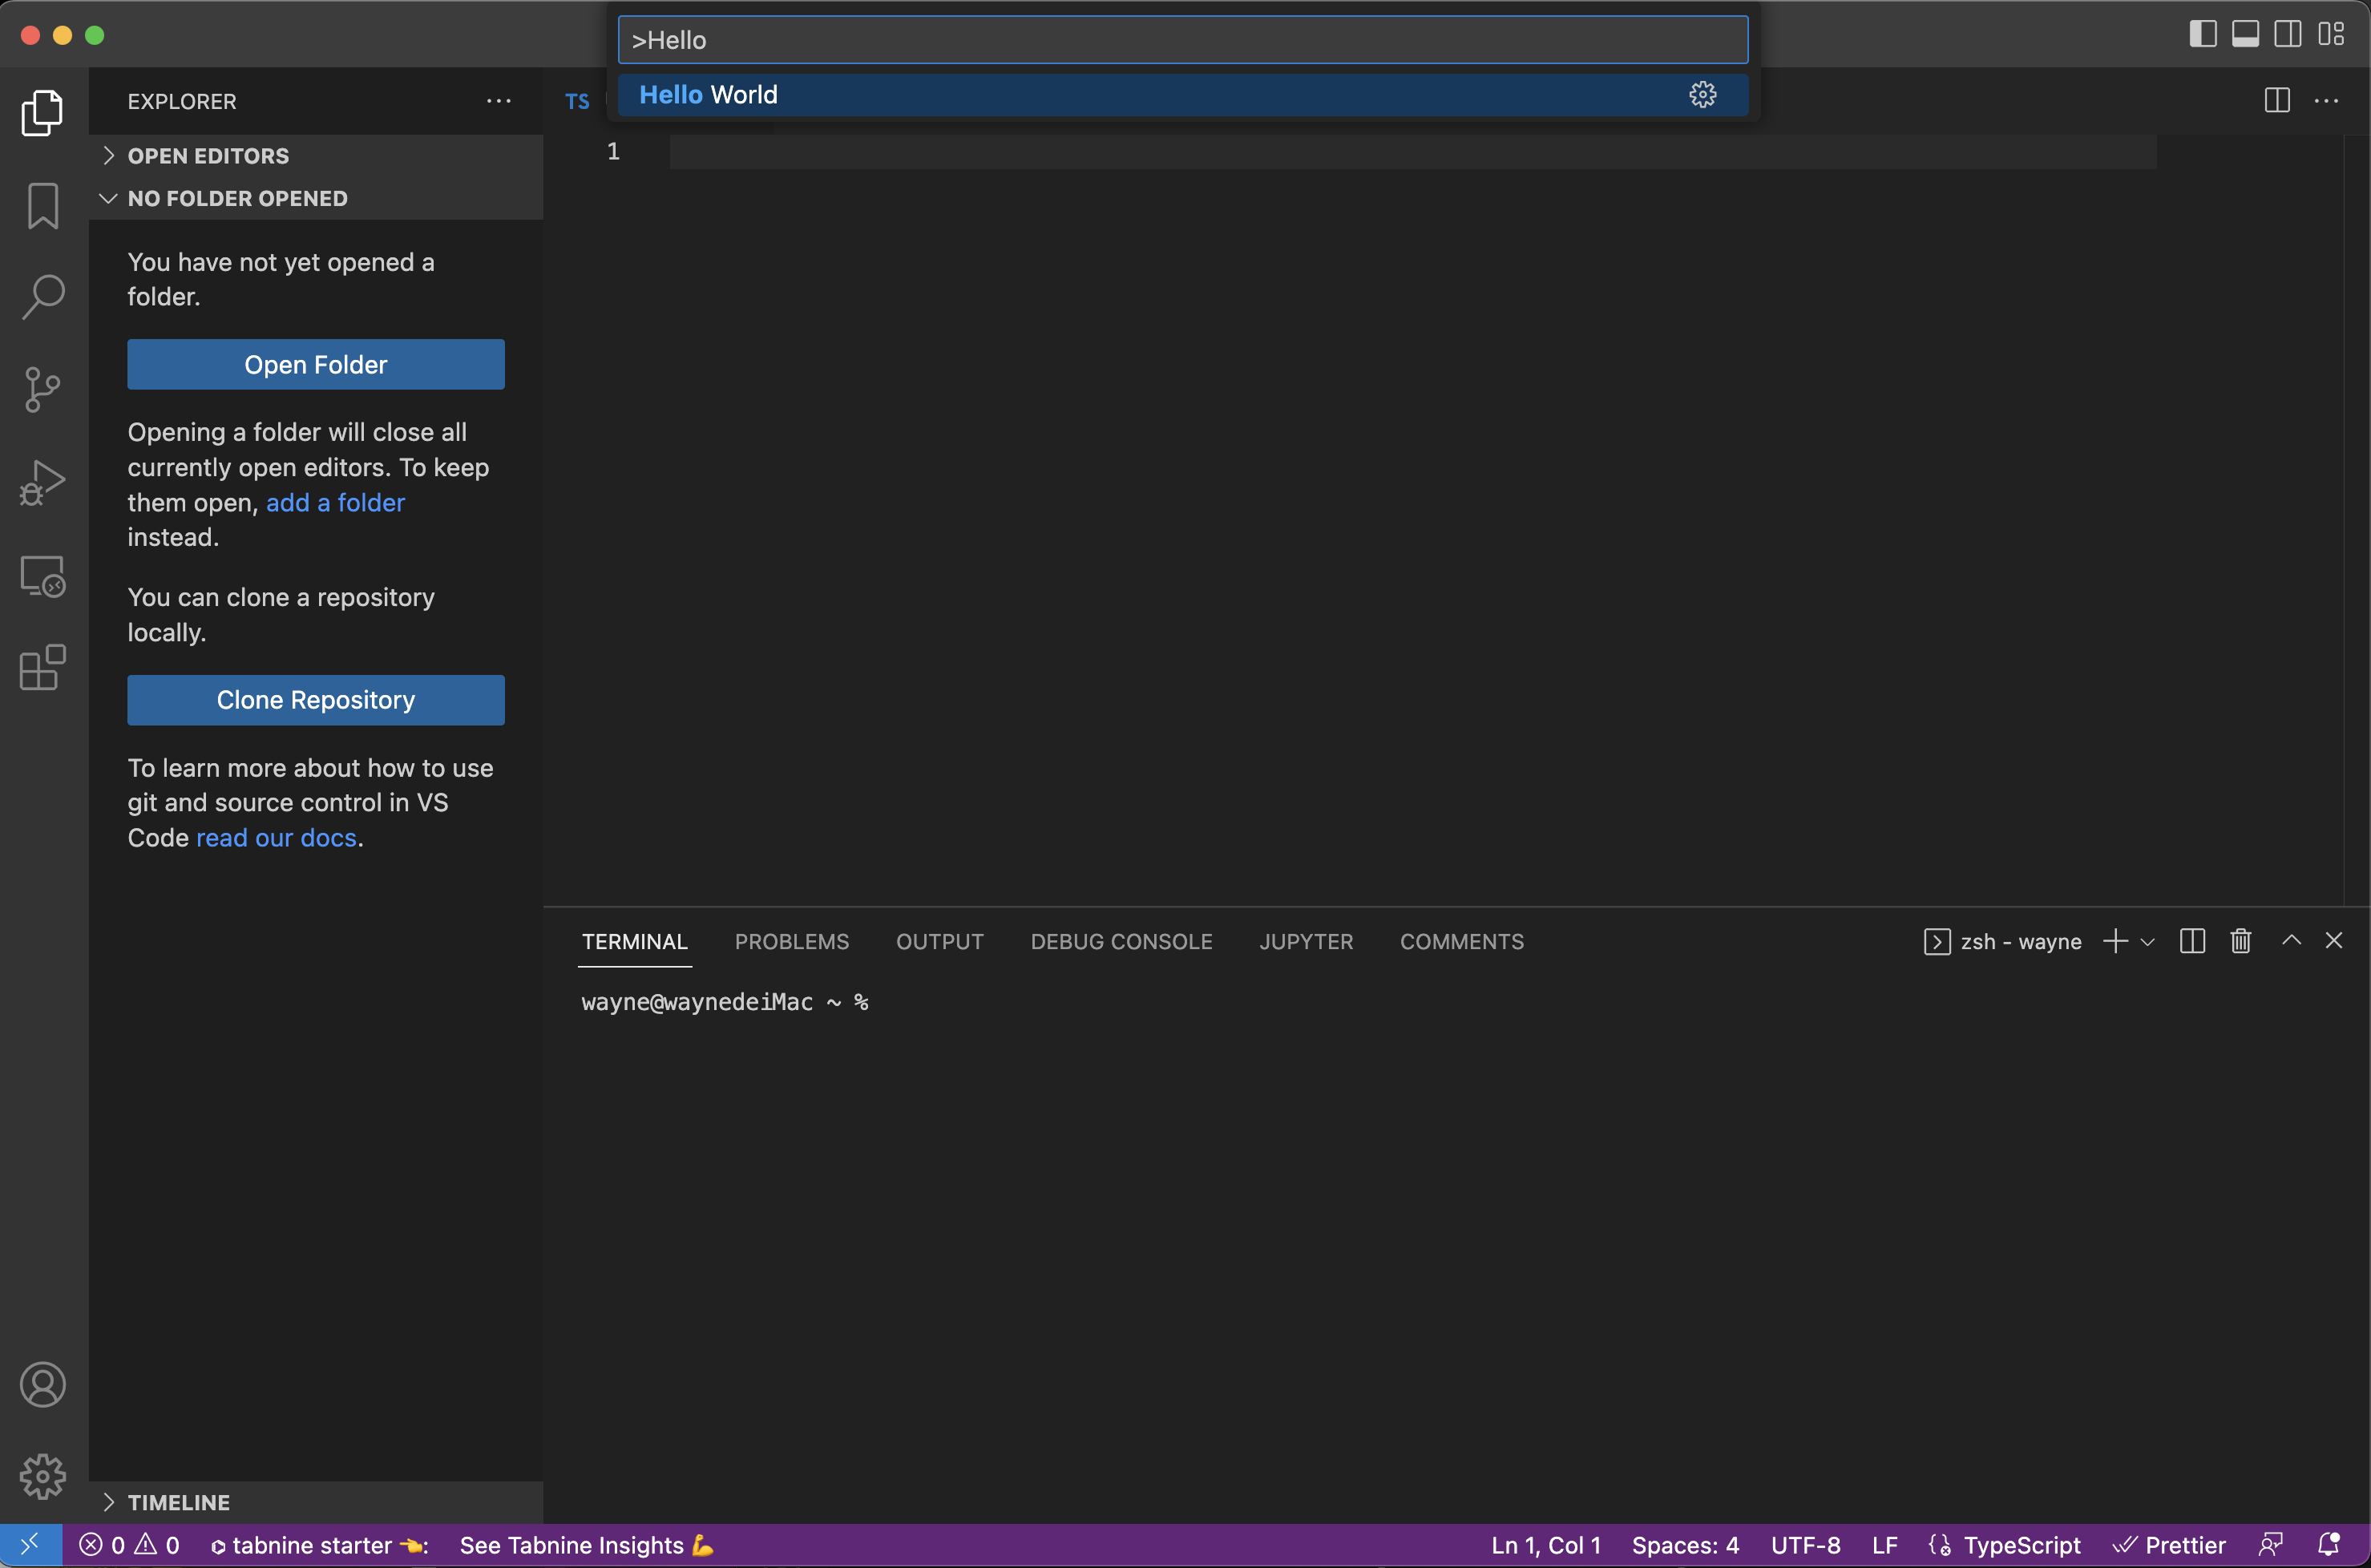
然後,點擊下去,我們可以看到 vscode 的 window 正確跳出「Hello World from day05-first-command!」訊息。

然後,我們回到原本專案的 Vscode Window,我們可以在專案的 debug console 檢視 active function 下面的 console.log 訊息。

加入套件邏輯
這邊可以依照你的需求進行套件邏輯的開發,我只是寫來玩而已,此處參考即可!
註冊自己想要使用的 Command
我打算製作以下幾個功能:
- 輸入指定的時間格式,會在當前檔案指標位置插入產生的時間戳
- 輸入指定的時間格式,僅會在vscode 的 window 顯示
- 將選取起來的時間戳,轉換為指定時區的時間格式(這邊以 YYYY-MM-DD hh:mm:ss.milsecond 格式為主)
附上完成後的程式碼:
extension.ts
 1
 2
 3
 4
 5
 6
 7
 8
 9
10
11
12
13
14
15
16
17
18
19
20
21
22
23
24
25
26
27
28
29
30
31
32
33
34
35
36
37
38
39
40
41
42
43
44
45
46
47
48
49
50
51
52
53
54
55
56
57
58
59
60
61
62
63
64
65
66
67
68
69
70
71
72
73
74
75
76
77
78
79
80
81
82
83
84
85
86
87
88
89
90
91
92
93
94
95
96
| import * as vscode from 'vscode';
export function activate(context: vscode.ExtensionContext) {
const input = async (placeHolder: string) => await vscode.window.showInputBox({
placeHolder
}) || '';
function pad(num: string | number, size: number): string {
num = num.toString();
while (num.length < size) {
num = "0" + num;
}
return num;
}
// show timestamp at vscode Information Window
function showTimestamp(datetime: string) {
let timestamp: number | undefined = NaN;
try {
timestamp = new Date(datetime).getTime();
if (typeof timestamp !== "number" || isNaN(timestamp) || timestamp.toString() === "NaN") {
return askDateTime();
};
vscode.window.showInformationMessage(timestamp.toString());
} catch(e) {
console.log(e);
vscode.window.showErrorMessage("Invalid Date.");
askDateTime();
}
}
// create input with asking DateTime
async function askDateTime() {
const fullDateTime = await input("DateTime (format: YYYY-MM-DD hh:mm:ss.ms) (example: 2022-12-31 23:59:59.999):");
if (fullDateTime) {
showTimestamp(fullDateTime);
}
}
// Insert timestamp at cursor position
vscode.commands.registerTextEditorCommand("wconvert.genTimestamp", async (editor, edit) => {
const fullDateTime = await input("DateTime (format: YYYY-MM-DD hh:mm:ss.ms) (example: 2022-12-31 23:59:59.999):");
if (!fullDateTime) {
return;
}
try {
let timestamp = new Date(fullDateTime).getTime();
if (!isNaN(timestamp) && typeof timestamp === "number" && timestamp.toString() !== "NaN") {
editor.edit((editBuilder) => {
editor.selections.forEach((selectionItem) => {
editBuilder.insert(selectionItem.active, timestamp.toString());
});
});
} else {
vscode.window.showErrorMessage("Datetime convert failed.");
}
} catch(e) {
vscode.window.showErrorMessage("Invalid Date.");
}
});
// only show generated timestamp
let generateTimestamp = vscode.commands.registerCommand("wconvert.genTimestampJustShow", askDateTime);
// format timestamp to YYYY-MM-DD HH:mm:ss that selections
let timestamp2DateTime = vscode.commands.registerTextEditorCommand("wconvert.timestamp2dateTime", async (editor, edit) => {
const offsetStr = await input("Time zone (example: +8):");
const offset = Number(offsetStr);
editor.edit((editBuilder) => {
editor.selections.forEach((selectionItem) => {
try {
const selection = editor.document.getText(selectionItem);
let dateArr = new Date(parseInt(selection) - (-offset * 60 * 60 * 1000)).toISOString().split("T");
const [YYYYMMDD, hhmmss] = dateArr;
const [year, month, day] = YYYYMMDD.split("-");
const [hour, minute, fullSecond] = hhmmss.split(":");
const [second, millionSecondZ] = fullSecond.split(".");
const millionSecond = millionSecondZ.replace("Z", "");
let fullDateTime = `"${year}-${pad(month, 2)}-${pad(day, 2)} ${pad(hour, 2)}:${pad(minute, 2)}:${pad(second, 2)}.${pad(millionSecond, 3)}"`;
editBuilder.replace(selectionItem, fullDateTime);
} catch (e) {
vscode.window.showErrorMessage("Invalid Date.");
}
});
});
});
context.subscriptions.push(timestamp2DateTime, generateTimestamp);
}
export function deactivate() {}
|
package.json 的 activationEvents 記得加上欲註冊使用的 command,也可直接使用 "*",將全部的 command 暴露出去!
package.json
1
2
3
4
5
6
7
8
9
10
11
12
13
14
15
16
17
18
19
20
21
22
23
24
25
26
27
28
29
30
31
32
33
34
35
36
37
38
39
40
41
42
43
44
45
46
47
48
49
50
51
52
53
54
55
56
57
58
59
60
61
62
63
| {
"name": "wconvert",
"displayName": "wconvert",
"description": "help you convert datetime value",
"version": "1.0.3",
"icon": "photo.jpeg",
"publisher": "4006wayne",
"repository": {
"type": "git",
"url": "https://github.com/wjdesign/vscode-extension-wconvert.git"
},
"homepage": "https://github.com/wjdesign/vscode-extension-wconvert/blob/master/README.md",
"pricing": "Free",
"engines": {
"vscode": "^1.73.0"
},
"categories": [
"Other"
],
"activationEvents": [
"onCommand:wconvert.timestamp2dateTime",
"onCommand:wconvert.genTimestamp",
"onCommand:wconvert.genTimestampJustShow"
],
"main": "./out/extension.js",
"contributes": {
"commands": [
{
"command": "wconvert.timestamp2dateTime",
"title": "WConvert: DateTime to timestamp"
},
{
"command": "wconvert.genTimestamp",
"title": "WConvert: Generate Timestamp"
},
{
"command": "wconvert.genTimestampJustShow",
"title": "WConvert: Generate Timestamp Only Show"
}
]
},
"scripts": {
"vscode:prepublish": "npm run compile",
"compile": "tsc -p ./",
"watch": "tsc -watch -p ./",
"pretest": "npm run compile && npm run lint",
"lint": "eslint src --ext ts",
"test": "node ./out/test/runTest.js"
},
"devDependencies": {
"@types/vscode": "^1.73.0",
"@types/glob": "^8.0.0",
"@types/mocha": "^10.0.0",
"@types/node": "16.x",
"@typescript-eslint/eslint-plugin": "^5.42.0",
"@typescript-eslint/parser": "^5.42.0",
"eslint": "^8.26.0",
"glob": "^8.0.3",
"mocha": "^10.1.0",
"typescript": "^4.8.4",
"@vscode/test-electron": "^2.2.0"
}
}
|
範例 repo
vsce
打包並發布 Extension,官方文件
使用 vsce 來打包與發布我的 Extension
首先全局安裝 vsce:
打包
下完指令後,會因為沒有 LICENSE 檔案而詢問是否繼續,這邊選擇 Y 直接下一步即可。

完成後會在指定位置產生一個 .vsix 檔案,此即為我的 Extensions。
本地安裝我的 Extension
若只是要製作一個自己用的 extension,沒有打算發布到網上,到此步驟即可。
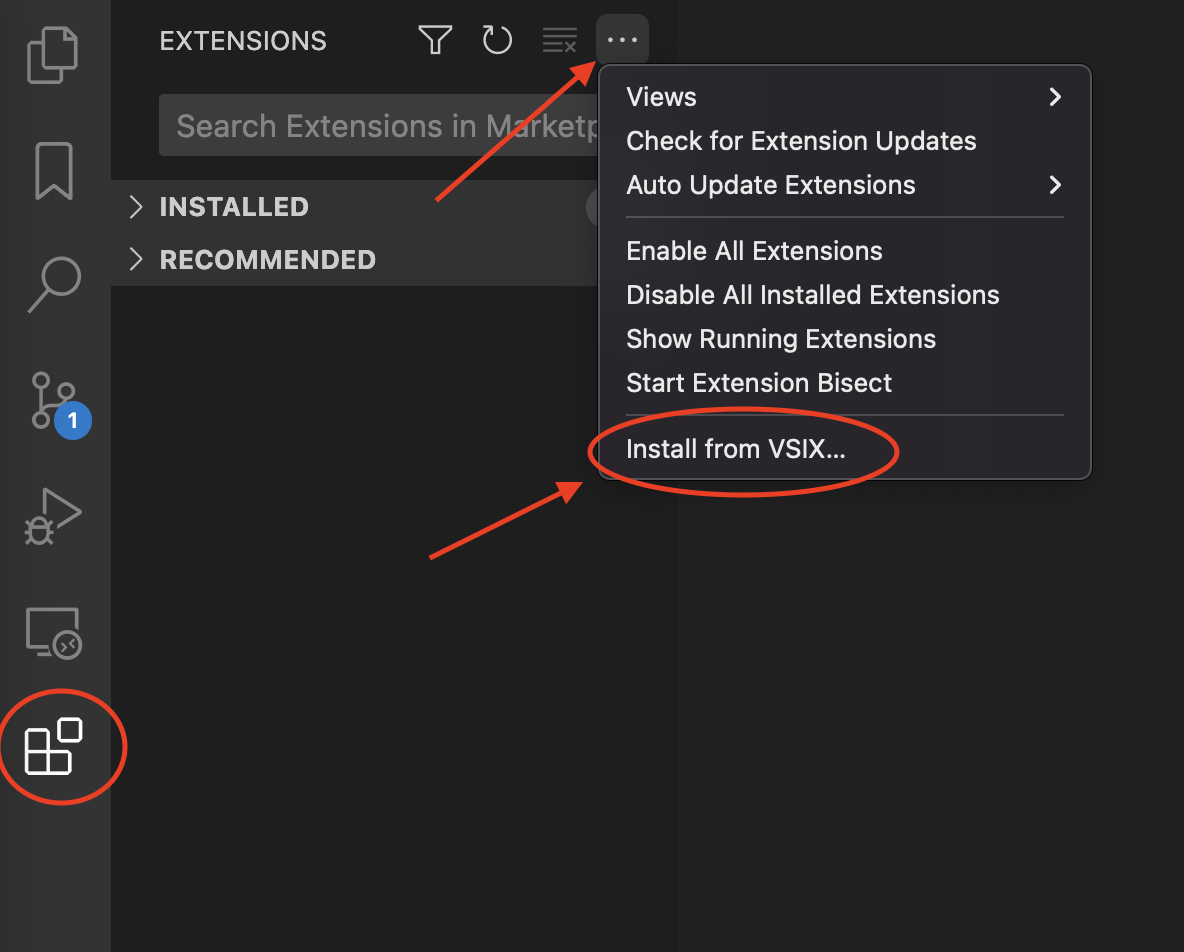
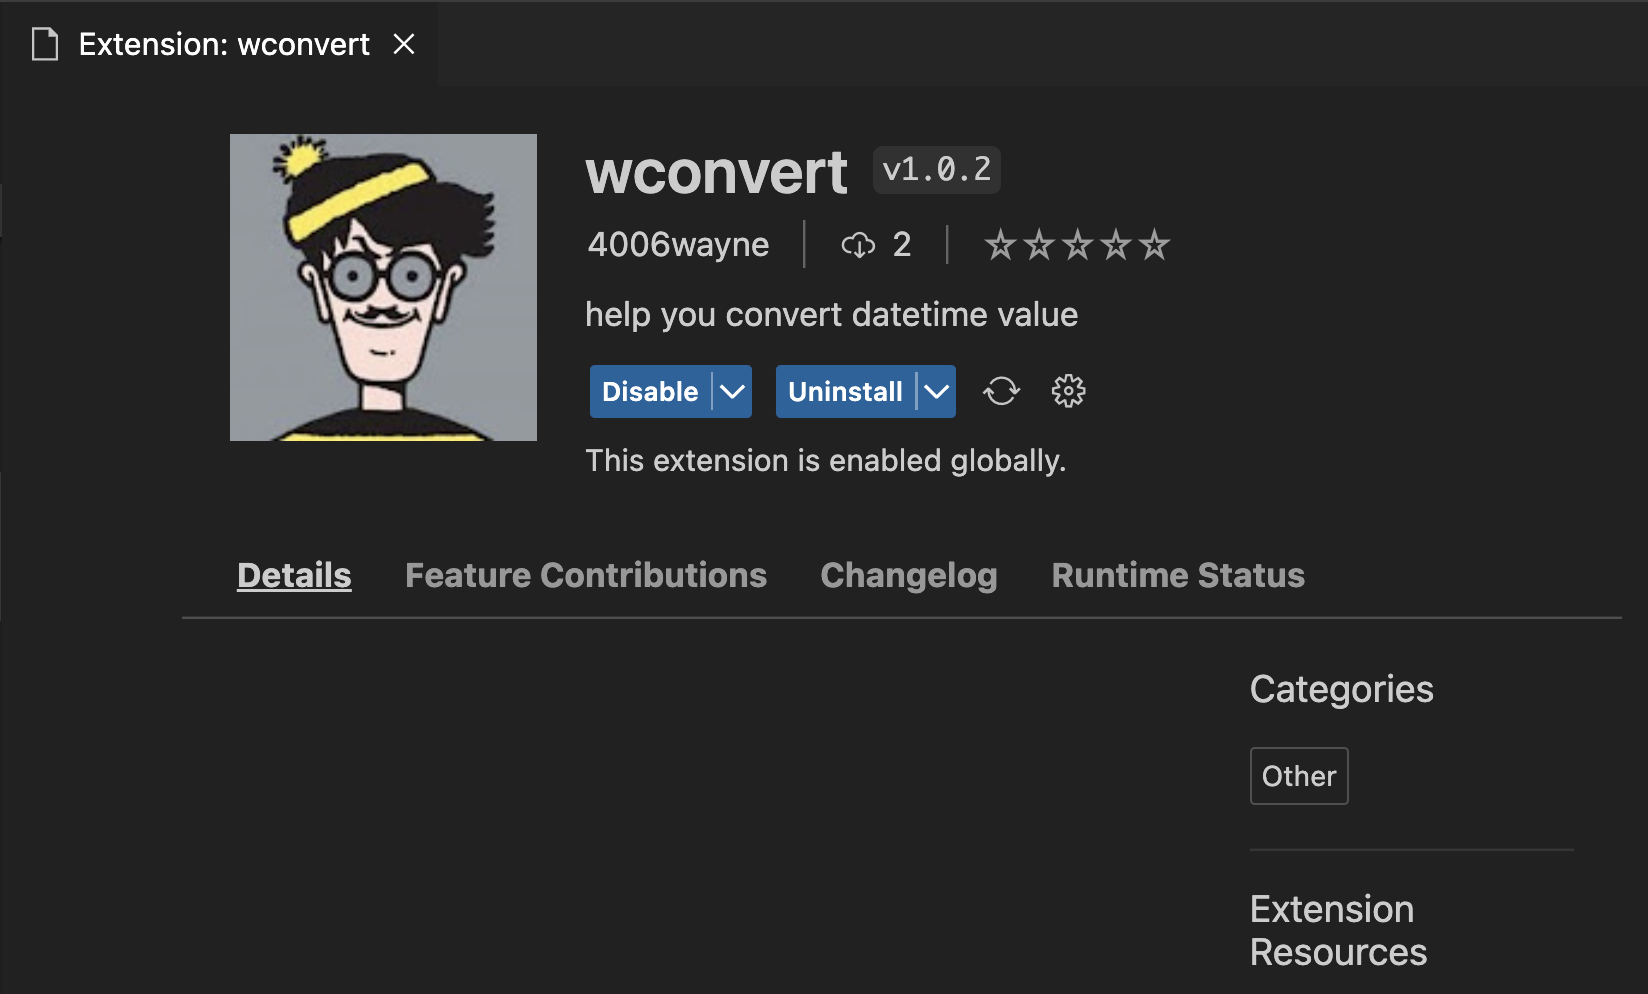
於 VScode 的 Extensions 頁籤,選擇 Install from VSIX,選擇剛剛產生的 .vsix 檔,即可完成安裝,在 Extensions 的 INSTALLED 內即可看到自己的 extension。
發布到 Marketplace 前的準備
記住!每次發佈都要幫版本號加一下!
package.json
1
2
3
4
5
| {
// ...
"version": "0.0.1",
// ...
}
|
vsce 要求 Personal Access Token 個人訪問金鑰,以下的步驟圖片來源為官方說明文件
首先請到 https://dev.azure.com/ 申請帳號並登入,在右上角打開 Personal access tokens 頁面。
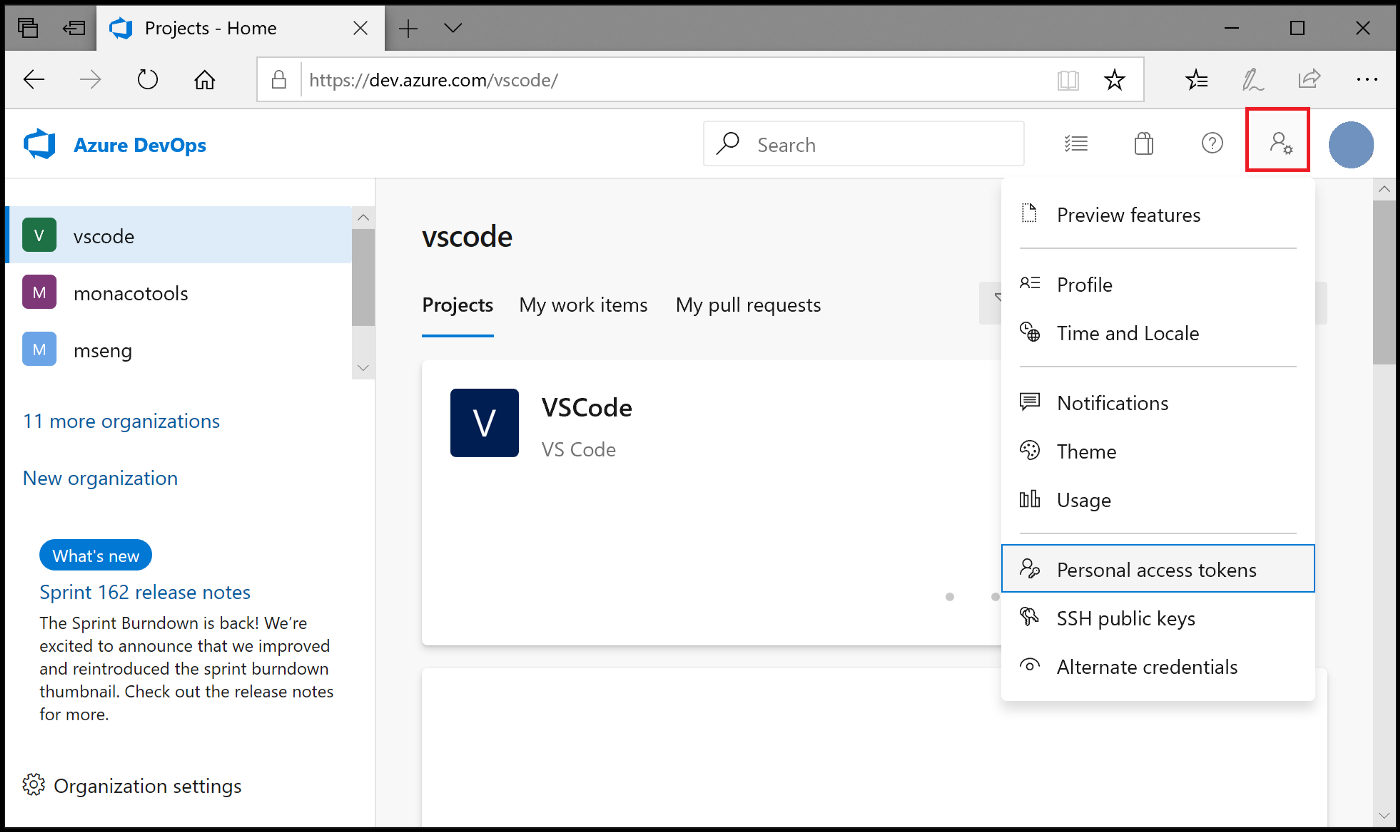
點選 New Token 按鈕。

給這個新 Token一個名字、過期時間,重點是 Organization 請選擇 All accessiable organization,點選 Custom defined 並點選 Show all scopes 打開所有選項。
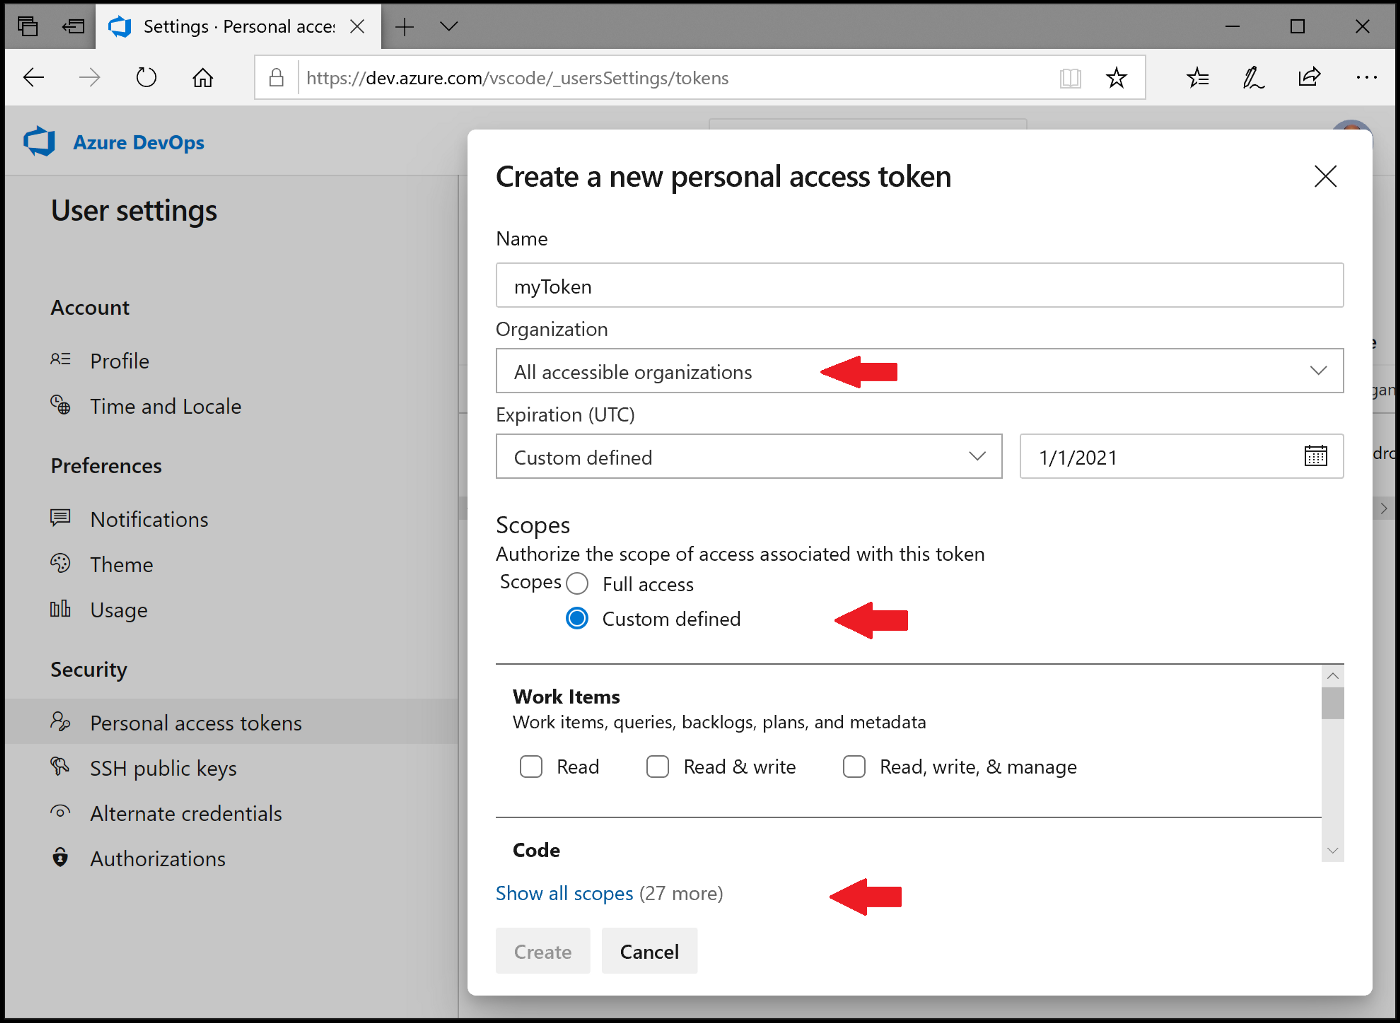
找到 Marketplace 項目勾選 Acquire 與 Manage 後點選 Create。

然後你會得到一個 Token 請複製下來。
建立發佈器 - Publisher
建立一個 Publisher 用來儲存發佈的 Token ,請在 package.json 中指定要使用的發佈器"publisher": (publisher name)
package.json
1
2
3
4
5
| {
// ...
"publisher": "{your publisher name}",
// ...
}
|
使用 Marketplace 後台建立 Publisher
請到 https://marketplace.visualstudio.com/manage/publishers/ 建立一個 Publisher。
使用 vsce 指令建立 Publisher
1
| vsce create-publisher (publisher name)
|
輸入剛剛的 Personal access token,vsce 將會記得這個 publisher 與 token 以方便快速發佈。
Token 更新
在我們建立 token 時,token 是有效期的,當 token 過期時我們就需要以下這個指來更新 token:
1
| vsce login (publisher name)
|
發布方式(一):使用 vsce 發布 extension
下指令發布到 Marketplace:
使用 vsce show 確認 extension 的資訊:
1
2
| # vsce show {publisher name}.{extension id}
vsce show 4006wayne.wconvert
|
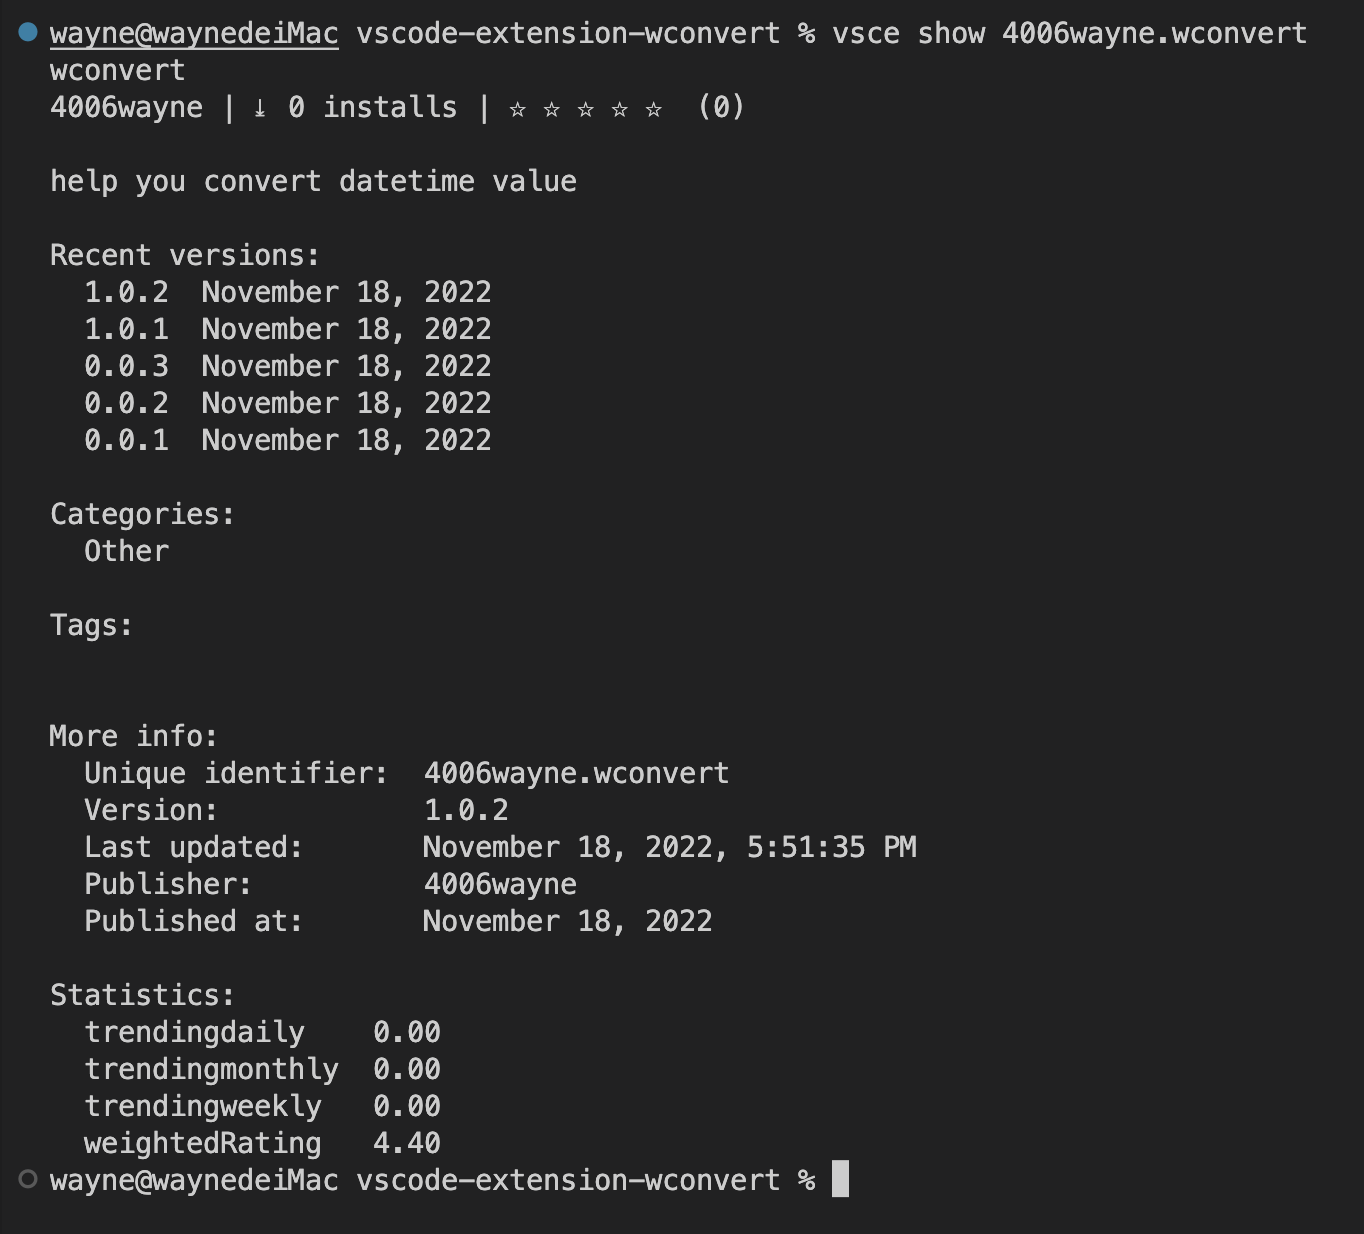
也可以在 vsce publish 時直接指定 token:
1
| vsce publish -p <token>
|
發布方式(二):使用 Marketplace 後台上傳,發布 extension
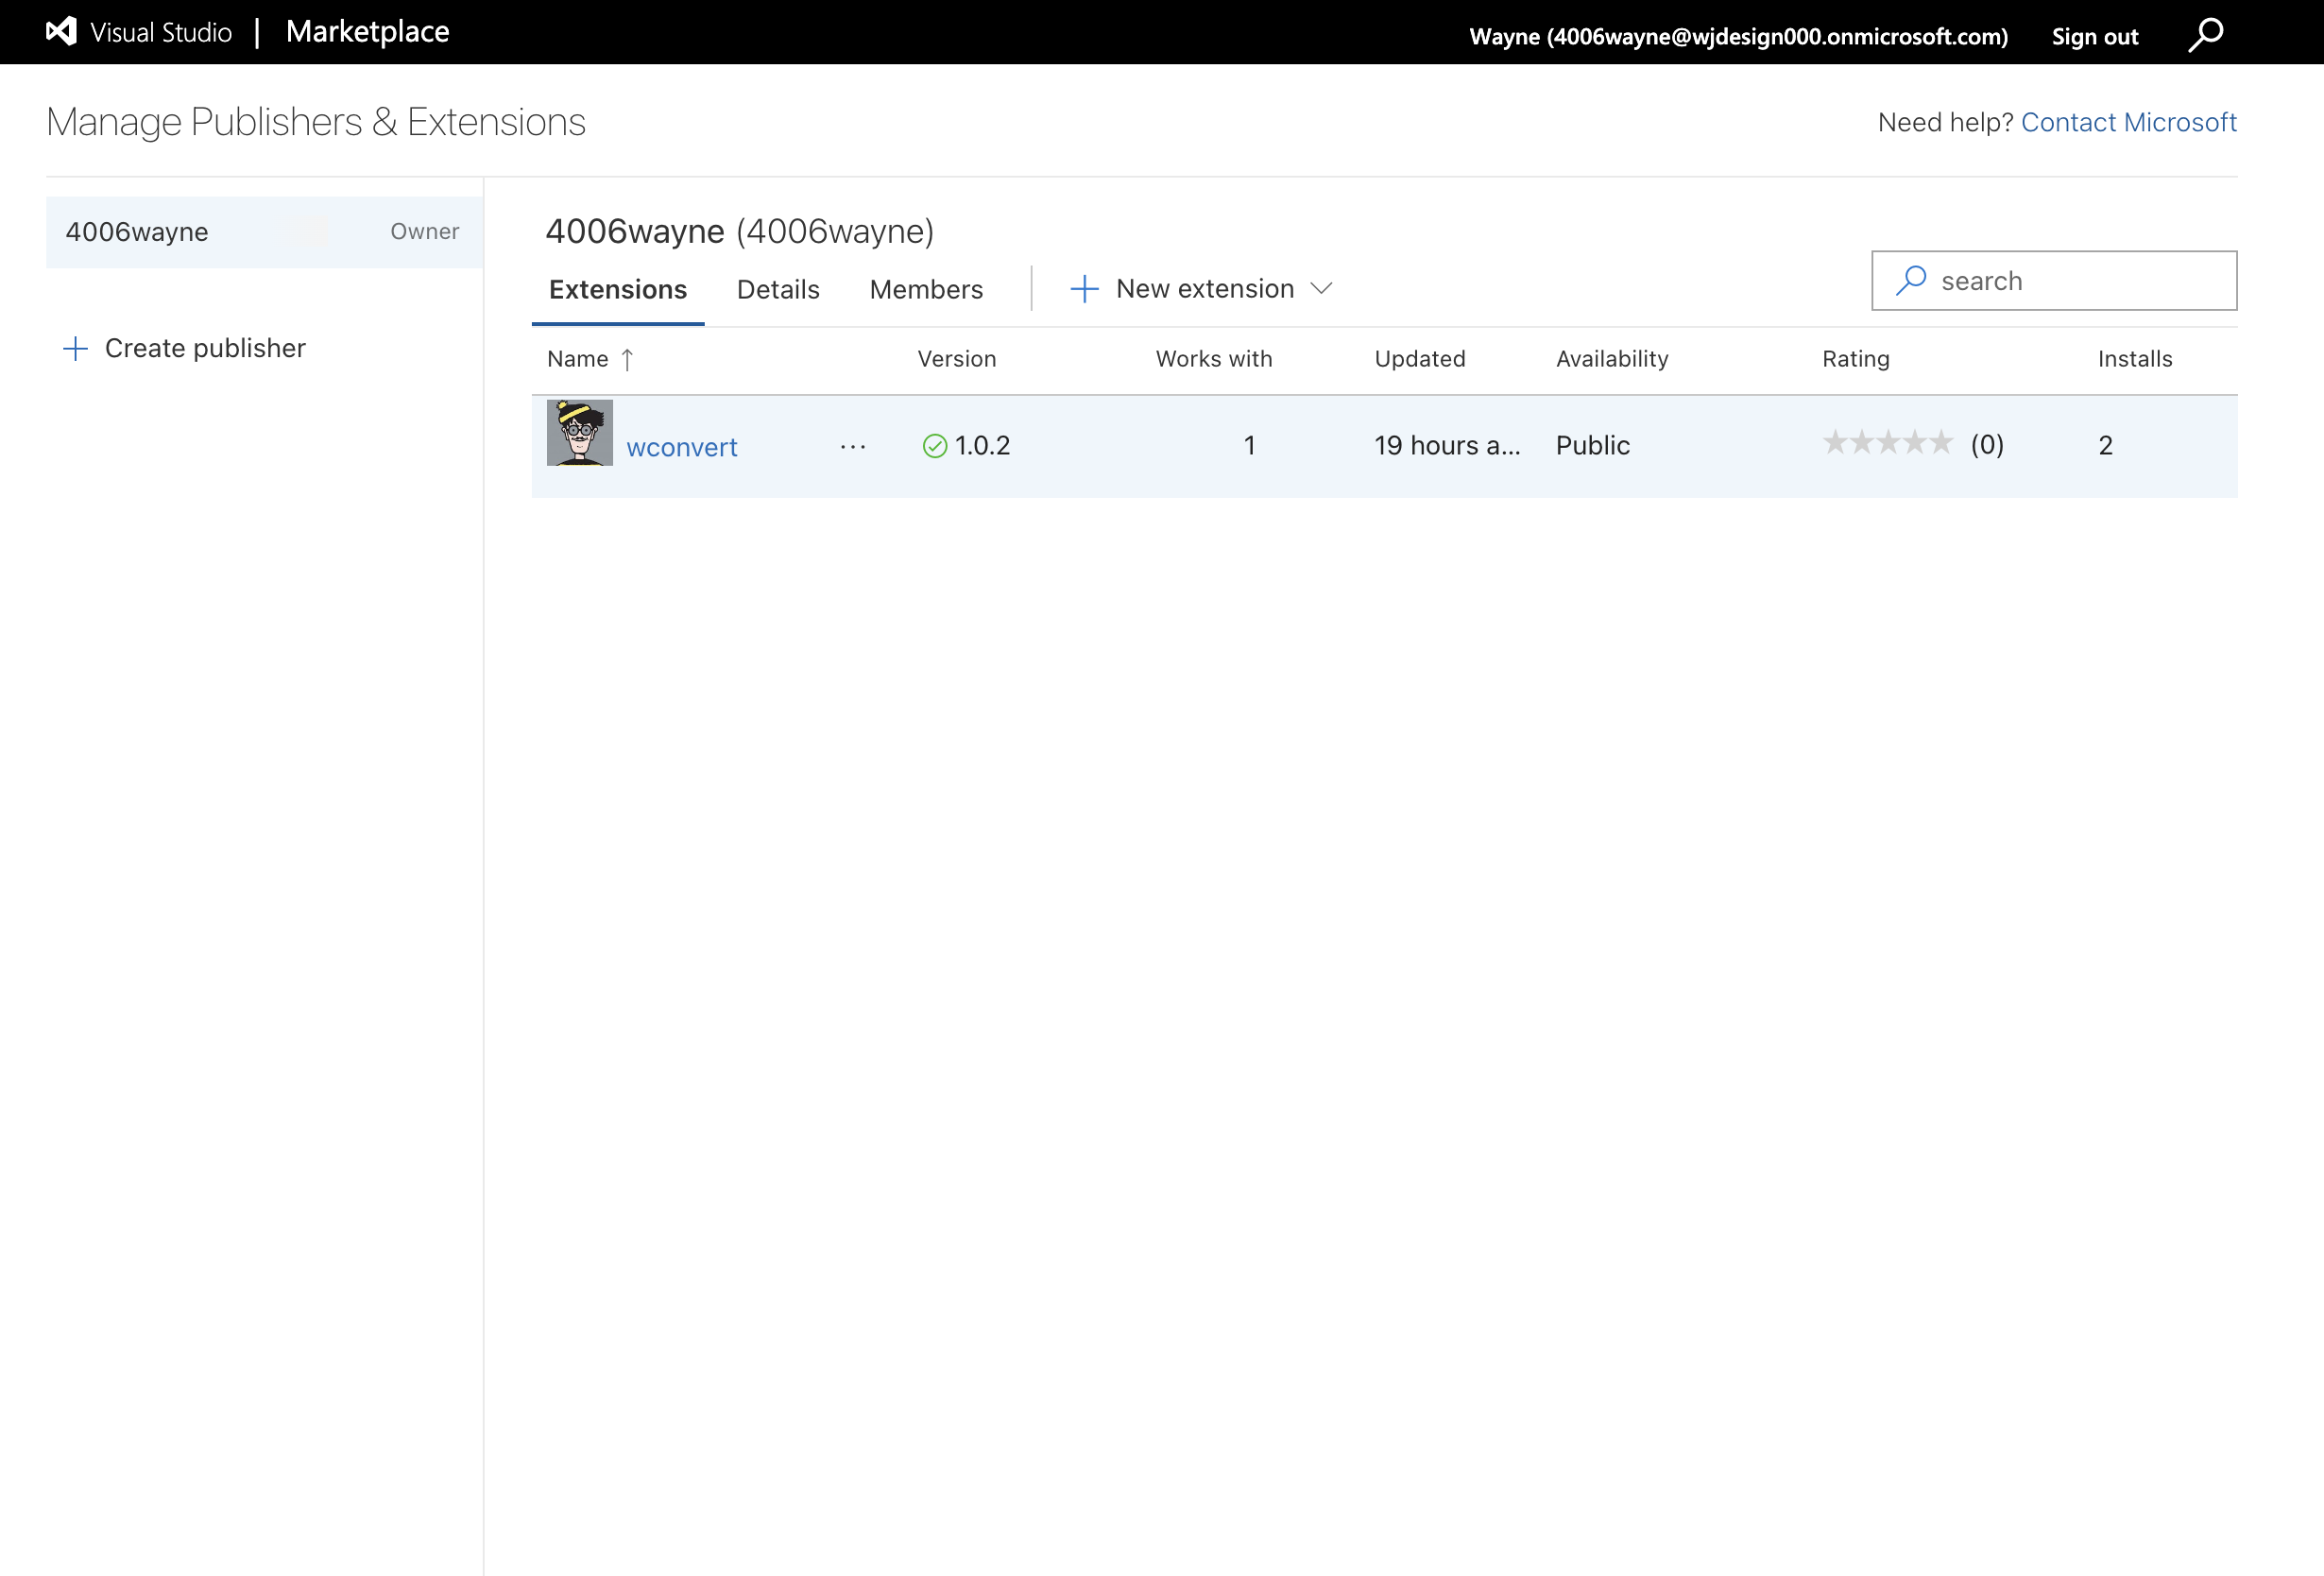
前往網址 https://marketplace.visualstudio.com/manage/publishers/,選擇剛剛創建的 Publisher。
點選 New extension > Visual Studio Code,選擇剛剛 package 出來的 .vsix 檔案後上傳。
上傳後等待驗證,驗證完畢後即可看到我的 extension:
結語
到這裡我已經成功發佈我的第一個 Extension 了!
這是我寫的第一個 Extension,功能很陽春,用途是產生指定時間的時間戳與時間戳轉回指定時區的時間格式。
非常推薦使用 Typescript 會比較容易開發,不然要查官方API會看得很痛苦,畢竟範例不多或者都要下載才能看。
實際撰寫時會遇到 VScode API 到底有哪些功能可以使用的問題,甚至要去了解 VScode 的設計結構!
常見問題
Extension validation error

出現如圖的問題,自行排查 extension 程式碼後發現非程式碼邏輯的問題,可以上 issues 將資訊反應給 vsmarketplace,此可能為 marketplace 驗證 extension 時偵測到特定字元組合而阻擋掉,會專人協助處理。
附上本人遇到此問題的 Issues


