本文適合 Vue3 初學者,或者 Vue2 遷移者,當然還是建議 Vue3 官網完全過一遍。
先推薦兩個 vscode 外掛
Volar
首先推薦 Volar ,使用 vscode 開發 Vue 專案的小夥伴肯定都認識 Vetur 這個神級外掛,有了它可以讓我們得開發如魚得水。 那麼 Volar 可以理解為 Vue3 版本的 Vetur ,程式碼高亮,語法提示,基本上 Vetur 有的它都有。
功能一:多個根節點編譯器不會報錯
Vue3 是允許我們有多個根節點的,但是我們如果使用 Vetur 就會報錯,不會影響執行,但是看起來就很煩。所以當我們轉向 Volar,那麼就不會出現這個問題了。

功能二:編輯器分隔
即便 Vue 的元件化開發,可以將單檔案的程式碼長度大幅縮短,但還是動輒幾百行甚是上千行。那麼我們切換 template、script、style 的時候就要頻繁上下翻,雖然有的外掛可以直接定位到 css,但是你回不去啊!所以這個功能簡直是太人性化了。
安裝完 Volar 以後,開啟一個 .vue 檔案,看 vscode 的右上角,有這麼一個圖示,點一下。


它就會自動給你分隔成三個頁面,分別對應 template、script、style,這樣就太舒服了有沒有。

還有很多新功能,可以參考下面這篇文章:
Volar - vue終極開發神器!
功能三:ref sugar 語法快捷改動支持
ref sugar 是一個還在 rfc 階段的功能,但是已經持續很久了,現在的 vue3 版本已經可以嚐鮮使用了。具體的用法以及語法我就不展開贅述了,我主要說一下 Volar 和 ref sugar 的結合。

報錯先不管,是 eslint-plugin-vue 的原因。
可以看到,在使用了 ref sugar 之後,script 上面出現了一個 ref sugar 的小圖標,並且打了個對勾,那麼我們點一下那個對勾,看看會發生什麼。

可以看到,我們點擊這個小對勾之後,它由原本的 ref sugar 語法變為了普通的 script setup 模式,驚不驚喜,意不意外。
功能四:style 裡面的 class 引用

可以看到,在 .foo 這個類名上面,出現了一個 1 reference 的小圖標,代表著當前 class 有一次引用,我們點擊一下這個 1 reference。

出現了一個彈窗,裡面是當前 class 的具體使用位置。
功能五:class 追朔
我們創建一個 template 根元素,在裡面寫入:
sample.vue
1
2
3
| <template>
<div class="foo"></div>
</template>
|
在 style 中寫入:
sample.vue
1
2
3
| <style scoped>
.foo {}
</style>
|
除了 style 中的 .foo 上面會出現 1 reference 的小圖標之外,在 class="foo" 的 foo 下面,會出現一道橫線。

對於經常使用 vscode 的開發人員來說,這代表什麼意義就不必多說了,我們根據提示,按住 ctrl(command) 然後點擊,會發現光標自己移動到了 style 中的 .foo 之前,哇! awesome!
功能六:css module 類型提示
css module 一般是 react 技術棧用的會比較多一些,就我個人來說,是從沒在 vue 裡面使用它的,因為 vue 提供了 scoped 作用域,不用擔心樣式衝突,直接使用預處理器會更加簡單方便。
我們創建如下代碼:
sample.vue
1
2
3
4
5
6
7
| <template>
<div :class="$style.foo"></div>
</template>
<style module>
.foo { }
</style>
|
然後將鼠標移動到 $style 上

有點意思,看來 vscode 是讓 Volar 玩明白了。
功能七:lang 語法提示
vue 可以使用 lang 屬性來選擇使用的語言,比如 template 中的 html/pug、script 中的 ts、style 中的 scss 等。
但是在以前,我們都是手動輸入的,編輯器,或者說 Vetur 並沒有給我們提供任何提示,有可能你找了很久的莫名其妙的問題,就是因為 lang 寫錯了。
但是這一切,在有了 Volar 之後,都不同了。

功能八:template 語法轉換
vue 默認提供了兩種模板供我們使用,但是一般都會使用 html,另外一種叫做 pug。
相對於 html,pug 更偏向於 yml 那種,簡潔程度特別高。
在 Volar 中,為我們提供了 html 和 pug 互相轉換的功能。
sample.vue
1
2
3
4
5
6
7
8
9
| <template>
<div>
<li></li>
<li></li>
<li>
<img />
</li>
</div>
</template>
|
在我們書寫 template 之後,template 頂部會出現一個小小的 pug 圖標,我們可以看到此時它是沒有被選中的。

這個時候我們點擊一下這個圖標,讓它選中,神奇的事情發生了。

我們寫好的 html 模板,被自動轉化成了 pug,再點擊一下,又回到了我們熟悉的 html。

從功能三開始,基本都是算內測的新功能,我是機緣巧合之下,將 Volar 下到本地進行查看的時候發現的這些。想嚐鮮的可以自己下載源碼,然後在packages/vscode-vue-languageservice/testCases目錄下體驗,希望這些功能可以盡快發布!
Vue 3 Snippets
推薦的第二個外掛叫做 Vue 3 Snippets ,同樣的,他也有自己的 Vue2 版本。它是幹什麼的呢,可以看一下下面這張圖,我只輸入了 "v3" ,它有很多提示,我們就先選擇 v3computed ,選中 Enter 即可。

然後它就給我們自動寫了如下程式碼:

是不是超級省事,摸魚的時間又增加了!還有更多有趣的使用方式,小夥伴們自行探索吧。
建立 Vue3 專案
那麼正式開始學習我們的 Vue3 ,先從建立專案開始。
使用 vue-cli 建立
輸入下面的命令然後選擇配置項進行安裝即可,這裡注意 vue-cli 的版本一定要在 ==4.5.0== 以上。
1
2
3
4
5
6
7
8
| ### 安裝或者升級
npm install -g @vue/cli
### 檢視版本 保證 vue cli 版本在 4.5.0 以上
vue --version
### 建立專案
vue create my-project
### 然後根據提示一步一步傻瓜式操作就行了
### ...
|
使用 Vite 建立
都說 Vue3.0 和 Vite2 更配,各種優化各種快,但都不屬於本文的內容,本文的目的我們只需要知道它特別好用、怎麼用就行了。我這裡是多選擇了 TS,每行都有註釋,一目瞭然。
1
2
3
4
5
6
7
8
| ### 初始化 viete 專案
npm init vite-app <project-name>
### 進入專案資料夾
cd <project-name>
### 安裝依賴
npm install
### 啟動專案
npm run dev
|
建立完以後我們先來看看入口檔案 main.ts
main.ts
1
2
3
4
5
6
| // 引入 createApp 函式,建立對應的應用,產生應用的例項物件
import { createApp } from 'vue';
// 引入 app 元件 (所有元件的父級元件)
import App from './App.vue';
// 建立 app 應用返回對應的例項物件,呼叫 mount 方法進行掛載,掛載到 #app 節點上去
createApp(App).mount('#app');
|
然後看看根元件 app.vue
app.vue
 1
 2
 3
 4
 5
 6
 7
 8
 9
10
11
12
13
14
15
16
17
18
19
20
21
22
23
24
25
26
| <!-- Vue2 元件中的 html 模板中必須要有一對根標籤,Vue3 元件的 html 模板中可以沒有根標籤 -->
<template>
<img alt="Vue logo" src="./assets/logo.png">
<!-- 使用子級元件 -->
<HelloWorld msg="Welcome to Your Vue.js + TypeScript App" />
</template>
<script lang="ts">
// 這裡可以書寫 TS 程式碼
// defineComponent 函式,目的是定義一個元件,內部可以傳入一個配置物件
import { defineComponent } from 'vue';
// 引入子級元件
import HelloWorld from './components/HelloWorld.vue';
// 暴露出去一個定義好的元件
export default defineComponent({
// 當前元件的名字
name: 'App',
// 註冊元件
components: {
// 註冊一個子級元件
HelloWorld,
},
});
</script>
|
Composition API

接下來到了重頭戲,Vue3 的招牌特性,Composition API。
關於 Composition API 這裡有圖解演示,極力推薦。
圖解 Option API vs Composition API
Composition API 可以更方便的抽取共通邏輯,但是不要過於在意邏輯程式碼複用,以功能提取程式碼也是一種思路。
順便提一句,Vue3 相容大部分 Vue2 語法,所以在 Vue3 中書寫 Vue2 語法是沒有問題的(廢除的除外),但是既然我們已經升級 Vue3 了,不建議混合使用,除非一些大型特殊專案需要相容兩個版本。
生命週期鉤子

setup
setup 是組合 Composition API 中的入口函式,也是第一個要使用的函式。setup 只在初始化時執行一次,所有的 Composition API 函式都在此使用。
1
2
3
| setup() {
console.log('我執行了') // 我執行了
},
|
可以通過 console.log 看到 setup 是在 beforeCreate 生命週期之前執行的(只執行一次):
1
2
3
4
5
6
7
8
9
| beforeCreate() {
console.log('beforeCreate執行了');
},
setup() {
console.log('setup執行了');
return {};
},
// setup執行了
// beforeCreate執行了
|
- 由此可以推斷出
setup 執行的時候,元件物件還沒有建立,元件實例物件 this 還不可用,此時 this 是 undefined,不能通過 this 來訪問 data、computed、methods、props。 - 返回物件中的^1.^屬性會與
data 函式返回物件的屬性合併成為元件物件的屬性;^2.^返回物件中的方法會與 methods 中的方法合併成功元件物件的方法。 - 如果有重名,
setup 優先。因為在 setup 中 this 不可用,methods 中可以訪問 setup 提供的屬性和方法,但在 setup 方法中不能訪問 data 和 methods 裡的內容,所以還是不建議混合使用。 setup 函式如果返回物件,物件中的屬性或方法,template 中可以直接使用。
sample.vue
 1
 2
 3
 4
 5
 6
 7
 8
 9
10
11
12
13
14
15
| <template>
<div>{{number}}</div>
</template>
<script>
// ...
setup() {
const number = 18;
return {
number,
};
},
// ...
</script>
|
注意:setup 不能是一個 async 函式,因為返回值不再是 return 的物件,而是 promise,template 中就不可以使用 return 中返回物件的資料了。
setup 的參數(^1.^props, ^2.^context):
props:是一個物件,裡面有父級元件向子級元件傳遞的資料,並且是在子級元件中使用 props 接收到的所有的屬性。context:上下文物件,可以通過 es6 語法解構 setup(props, {^(a).^attrs, ^(b).^slots, ^(c).^emit})
> a). attrs:獲取當前元件標籤上所有沒有通過 props 接收的屬性的物件,相當於 this.$attrs。
> b). slots:包含所有傳入的插槽內容的物件,相當於 this.$slots。
> c). emit:用來分發自定義事件的函式,相當於 this.$emit。
parent.vue
 1
 2
 3
 4
 5
 6
 7
 8
 9
10
11
12
13
14
15
16
17
18
19
20
| <template>
<child :msg="msg" msg2='哈哈哈' />
</template>
<script lang='ts'>
import { defineComponent, ref } from 'vue';
// 引入子元件
import Child from './components/Child.vue';
export default defineComponent({
name: 'App',
components: {
Child,
},
setup() {
const msg = ref('hello,vue3');
return {
msg,
};
},
});
</script>
|
children.vue
 1
 2
 3
 4
 5
 6
 7
 8
 9
10
11
12
13
14
15
16
17
| <template>
<h2>子元件</h2>
<h3>msg:{{ msg }}</h3>
</template>
<script lang='ts'>
import { defineComponent } from 'vue';
export default defineComponent({
name: 'Child',
props: ['msg'],
setup(props, {attrs, slots, emit}) {
console.log('props:', props); // msg: "hello,vue3"
console.log('attrs:', attrs); // msg2: "哈哈哈"
return {};
},
});
</script>
|
parent.vue
 1
 2
 3
 4
 5
 6
 7
 8
 9
10
11
12
13
14
| <template>
<child @click="show" />
</template>
<script lang='ts'>
setup() {
const show = () => {
console.log('name:', 'hzw');
};
return {
show,
};
},
</script>
|
children.vue
 1
 2
 3
 4
 5
 6
 7
 8
 9
10
11
12
13
14
15
16
17
18
| <template>
<button>事件分發</button>
</template>
<script lang='ts'>
import { defineComponent } from 'vue';
export default defineComponent({
name: 'Child',
setup(props, { emit }) {
const emitFn = () => {
emit('show');
};
return {
emitFn,
};
},
});
</script>
|
ref
- 作用:定義一個響應式的資料(一般用來定義一個基本型別的響應式資料
Undefined、Null、Boolean、Number、String) - 語法:
1
| const xxx = ref(initValue);
|
- 注意:
script 中操作資料需要使用 xxx.value 的形式,而 template 中不需要新增 .value
用一個例子來演示,實現一個按鈕,點選可以增加數字:
addNum.vue
1
2
3
4
| <template>
<div>{{count}}</div>
<button @click='updateCount'>增加</button>
</template>
|
在 Vue2 中:
 1
 2
 3
 4
 5
 6
 7
 8
 9
10
11
12
13
14
| <script>
// ...
data() {
return {
conunt: 0,
};
},
methods: {
updateCount() {
this.conunt++;
},
},
// ...
</script>
|
在 Vue3 中:
 1
 2
 3
 4
 5
 6
 7
 8
 9
10
11
12
13
14
15
16
| <script>
// ...
setup() {
// ref 用於定義一個響應式的資料,返回的是一個 Ref 物件,物件中有一個 value 屬性
// 如果需要對資料進行操作,需要使用該 Ref 物件的 value 屬性
const count = ref(0);
function updateCount() {
count.value++;
}
return {
count,
updateCount
};
},
// ...
</script>
|
在 Vue2 中我們通過 this.$refs 來獲取 dom 節點,Vue3 中我們通過 ref 來獲取節點。
首先需要在標籤上新增 ref='xxx',然後再 setup 中定義一個初始值為 null 的 ref 型別,名字要和標籤的 ref 屬性一致。
注意 :一定要在 setup 的 return 中返回,不然會報錯。
用一個例子來演示,讓輸入框自動獲取焦點:
autoFocus.vue
 1
 2
 3
 4
 5
 6
 7
 8
 9
10
11
12
13
14
15
16
17
18
19
20
21
22
23
24
25
26
| <template>
<h2>App</h2>
<input type="text">---
<input type="text" ref="inputRef">
</template>
<script lang="ts">
import { onMounted, ref } from 'vue'
/*
ref獲取元素: 利用 ref 函式獲取元件中的標籤元素
功能需求: 讓輸入框自動獲取焦點
*/
export default {
setup() {
const inputRef = ref<HTMLElement|null>(null)
onMounted(() => {
inputRef.value && inputRef.value.focus()
})
return {
inputRef
}
},
}
</script>
|
reactive
- 作用:定義多個數據的響應式,接收一個普通物件然後返回該普通物件的響應式代理器物件(
Proxy),響應式轉換是"深層的":會影響物件內部所有巢狀的屬性,所有的資料都是響應式的。 - 語法:
1
| const proxy = reactive(obj)
|
 1
 2
 3
 4
 5
 6
 7
 8
 9
10
11
12
13
14
15
16
17
18
19
20
21
22
23
24
25
26
27
28
29
30
31
| <template>
<h3>姓名:{{user.name}}</h3>
<h3>年齡:{{user.age}}</h3>
<h3>wife:{{user.wife}}</h3>
<button @click="updateUser">更新</button>
</template>
<script>
// ...
setup() {
const user = reactive({
name: 'hzw',
age: 18,
wife: {
name: 'xioaohong',
age: 18,
books: ['紅寶書', '設計模式', '演算法與資料結構'],
},
});
const updateUser = () => {
user.name = '小紅';
user.age += 2;
user.wife.books[0] = '金瓶梅';
};
return {
user,
updateUser,
};
},
// ...
</script>
|
computed
- 與
Vue2 中的 computed 配置功能一致,返回的是一個 ref 型別的物件。 computed 的函式中如果只傳入一個箭頭函式 表示的是 get 操作:
 1
 2
 3
 4
 5
 6
 7
 8
 9
10
11
12
13
| import { computed } from 'vue';
const user = reactive({
firstName: '韓',
lastName: '志偉',
});
const fullName1 = computed(() => {
return user.firstName + user.lastName;
});
return {
user,
fullName1,
};
|
computed 的函式中可以傳入一個物件,可以包含 set 和 get 函式,進行讀取和修改的操作:
 1
 2
 3
 4
 5
 6
 7
 8
 9
10
11
12
13
14
15
16
17
18
19
20
| import { computed } from 'vue';
const user = reactive({
firstName: '韓',
lastName: '志偉',
});
const fullName2 = computed({
get() {
return user.firstName + '_' + user.lastName;
},
set(val: string) {
const names = val.split('_');
user.firstName = names[0];
user.lastName = names[1];
},
});
return {
user,
fullName2,
};
|
watch
- 與
Vue2 中的 watch 配置功能一致。 - 作用:監視指定的一個或多個響應式資料,一旦資料變化,就自動執行監視回撥。
- 語法:watch(
要監聽的資料, 回調函式, 配置) - 預設初始時不執行回調,但可以通過配置的
immediate 為 true,來指定初始時立即執行第一次。 - 通過配置的
deep 為 true,來指定深度監視。
 1
 2
 3
 4
 5
 6
 7
 8
 9
10
11
12
13
14
15
16
17
18
| import { watch, ref } from 'vue';
const user = reactive({
firstName: '韓',
lastName: '志偉',
});
const fullName3 = ref('');
watch(
user,
({ firstName, lastName }) => {
fullName3.value = firstName + '_' + lastName;
},
{ immediate: true, deep: true }
);
return {
user,
fullName3,
};
|
watch 監聽多個數據,使用陣列。
watch 監聽非響應式資料的時候需要使用回調函式的形式。
 1
 2
 3
 4
 5
 6
 7
 8
 9
10
| watch(
[
() => user.firstName,
() => user.lastName,
fullName3
],
() => {
console.log('我執行了')
}
)
|
watchEffect
- 作用:監視資料發生變化時執行回調,不用直接指定要監視的資料,回調函式中使用的哪些響應式資料就監視哪些響應式資料,預設初始時就會執行第一次,從而可以收集需要監視的資料。
 1
 2
 3
 4
 5
 6
 7
 8
 9
10
11
12
13
14
15
16
17
18
19
20
21
| import { watchEffect, ref } from 'vue';
const user = reactive({
firstName: '韓',
lastName: '志偉',
});
const fullName4 = ref('');
watchEffect(() => {
fullName4.value = user.firstName + '_' + user.lastName;
});
return {
user,
fullName4,
};
// watchEffect可以實現計算屬性set方法
watchEffect(() => {
const names = fullName3.value.split('_');
user.firstName = names[0];
user.lastName = names[1];
});
|
生命週期對比:

- 注意:
3.0 中的生命週期鉤子要比 2.X 中相同生命週期的鉤子要快。 Composition API 還新增了以下用於除錯的鉤子函式,但是不怎麼常用:onRenderTracked、onRenderTriggered。- 程式碼演示:
 1
 2
 3
 4
 5
 6
 7
 8
 9
10
11
12
13
14
15
16
17
18
19
20
21
22
23
24
25
| setup() {
onBeforeMount(() => {
console.log('--onBeforeMount')
})
onMounted(() => {
console.log('--onMounted')
})
onBeforeUpdate(() => {
console.log('--onBeforeUpdate')
})
onUpdated(() => {
console.log('--onUpdated')
})
onBeforeUnmount(() => {
console.log('--onBeforeUnmount')
})
onUnmounted(() => {
console.log('--onUnmounted')
})
}
|
toRefs
- 作用:把一個響應式物件轉換成普通物件,該普通物件的每個屬性都是一個
ref。 - 應用:我們使用
reactive 建立的物件,如果想在模板中使用,就必須得使用 xxx.xxx 的形式,如果大量用到的話還是很麻煩的,但是使用 es6 解構以後,會失去響應式,那麼 toRefs 的作用就體現在這,利用 toRefs 可以將一個響應式 reactive 物件的所有原始屬性轉換為響應式的 ref 屬性。當然小夥伴們可以自行開發更多應用場景。 - 程式碼演示:
 1
 2
 3
 4
 5
 6
 7
 8
 9
10
11
12
13
14
15
16
17
18
19
20
21
22
23
24
25
26
27
28
| <template>
<div>
name:{{name}}
</div>
</template>
<script lang='ts'>
import { defineComponent, reactive, toRefs } from 'vue';
export default defineComponent({
name: '',
setup() {
const state = reactive({
name: 'hzw',
});
const state2 = toRefs(state);
setInterval(() => {
state.name += '===';
}, 1000);
return {
// 通過 toRefs 返回的物件,解構出來的屬性也是響應式的
...state2,
};
},
});
</script>
|
provide 與 inject
parent.vue
 1
 2
 3
 4
 5
 6
 7
 8
 9
10
11
12
13
14
15
16
17
18
19
20
21
22
23
24
25
26
27
28
29
| <template>
<h1>父元件</h1>
<p>當前顏色: {{color}}</p>
<button @click="color='red'">紅</button>
<button @click="color='yellow'">黃</button>
<button @click="color='blue'">藍</button>
<hr>
<Son />
</template>
<script lang="ts">
import { provide, ref } from 'vue'
import Son from './son.vue'
export default {
name: 'ProvideInject',
components: {
Son
},
setup() {
const color = ref('red')
provide('color', color)
return {
color
}
}
}
</script>
|
son.vue
 1
 2
 3
 4
 5
 6
 7
 8
 9
10
11
12
13
14
15
16
17
| <template>
<div>
<h2>子元件</h2>
<hr>
<GrandSon />
</div>
</template>
<script lang="ts">
import GrandSon from './grandson.vue'
export default {
components: {
GrandSon
},
}
</script>
|
grandson.vue
 1
 2
 3
 4
 5
 6
 7
 8
 9
10
11
12
13
14
15
16
17
| <template>
<h3 :style="{color}">孫子元件: {{color}}</h3>
</template>
<script lang="ts">
import { inject } from 'vue'
export default {
setup() {
const color = inject('color')
return {
color
}
}
}
</script>
|
其他特性
Teleport(瞬移)
- 作用:
Teleport 提供了一種乾淨的方法,讓元件的 html 在父元件介面外的特定標籤(很可能是 body )下插入顯示,換句話說就是可以把子元件或者dom節點插入到任何你想插入到的地方去。 - 語法:使用
to 屬性,引號內使用選擇器。
1
| <teleport to="body"></teleport>
|
parent.vue
 1
 2
 3
 4
 5
 6
 7
 8
 9
10
11
12
13
14
15
16
17
18
19
| <template>
<div class="father">
<h2>App</h2>
<modal-button></modal-button>
</div>
</template>
<script lang="ts">
import ModalButton from './components/ModalButton.vue'
export default {
setup() {
return {}
},
components: {
ModalButton,
},
}
</script>
|
children.vue
 1
 2
 3
 4
 5
 6
 7
 8
 9
10
11
12
13
14
15
16
17
18
19
20
21
22
23
24
25
26
27
28
29
30
31
| <template>
<div class="son">
<button @click="modalOpen = true">
點我開啟對話方塊
</button>
<teleport to="body">
<div v-if="modalOpen" class="looklook">
看看我出現在了哪裡
<button @click="modalOpen = false">
Close
</button>
</div>
</teleport>
</div>
</template>
<script>
import { ref } from 'vue'
export default {
name: 'modal-button',
setup() {
const modalOpen = ref(false)
return {
modalOpen,
}
},
}
</script>
|
可以看到在子元件中的 looklook 元素跑到了 body 下面,而之前的位置默認出現了兩行註釋。

Suspense(不確定的)
- 作用:它們允許我們的應用程式在等待非同步元件時渲染一些後備內容,可以讓我們建立一個平滑的使用者體驗。
- 語法:
 1
 2
 3
 4
 5
 6
 7
 8
 9
10
11
| <Suspense>
<template v-slot:default>
<!-- 非同步元件 -->
<AsyncComp />
</template>
<template v-slot:fallback>
<!-- 後備內容 -->
<h1>LOADING...</h1>
</template>
</Suspense>
|
vue3 中引入非同步元件的方式:
1
| const AsyncComp = defineAsyncComponent(() => import('./AsyncComp.vue'))
|
parent.vue
 1
 2
 3
 4
 5
 6
 7
 8
 9
10
11
12
13
14
15
16
17
18
19
20
21
22
23
24
25
26
27
28
29
| <template>
<Suspense>
<!-- v-slot:defaul 可以簡寫成 #defaul -->
<template v-slot:default>
<AsyncComp/>
</template>
<!-- v-slot:defaul 可以簡寫成 #fallback -->
<template v-slot:fallback>
<h1>LOADING...</h1>
</template>
</Suspense>
</template>
<script lang="ts">
import { defineAsyncComponent } from 'vue'
const AsyncComp = defineAsyncComponent(() => import('./AsyncComp.vue'))
export default {
setup() {
return {
}
},
components: {
AsyncComp,
}
}
</script>
|
children.vue
 1
 2
 3
 4
 5
 6
 7
 8
 9
10
11
12
13
14
15
16
17
18
19
| <template>
<h2>AsyncComp22</h2>
<p>{{msg}}</p>
</template>
<script lang="ts">
export default {
name: 'AsyncComp',
setup () {
return new Promise((resolve, reject) => {
setTimeout(() => {
resolve({
msg: 'abc'
})
}, 2000)
})
}
}
</script>
|
通過下圖可以看到在非同步元件加載出來之前,顯示的是 fallback 中的內容:

響應式資料的判斷
作用
- isRef:檢查一個值是否為一個
ref 物件 - isReactive:檢查一個物件是否是由
reactive 建立的響應式代理 - isReadonly:檢查一個物件是否是由
readonly 建立的只讀代理 - isProxy:檢查一個物件是否是由
reactive 或者 readonly 方法建立的代理
程式碼演示
 1
 2
 3
 4
 5
 6
 7
 8
 9
10
11
12
13
14
15
16
| setup() {
const state1 = ref(1);
console.log('isref:', isRef(state1)); // isref: true
const state2 = reactive({});
console.log('isReactive:', isReactive(state2)); // isReactive: true
const state3 = readonly({});
console.log('isReadonly:', isReadonly(state3)); // isReadonly: true
const state4 = reactive({});
console.log('isProxy:', isProxy(state2)); // isProxy: true
console.log('isProxy:', isProxy(state4)); // isProxy: true
return {};
},
|
其他不常用特性
還有很多很多不常用的新特性,我在日常開發中是沒有用到的,很多都是用來做優化的,感興趣的小夥伴們自行去官網檢視,或者大佬們可以介紹一下應用場景。
- shallowReactive
- shallowRef
- readonly
- shallowReadonly
- markRaw
- customRef
- …
語法糖
雖然 Composition API 用起來已經非常方便了,但是我們還是有很煩的地方,比如:
- 元件引入了還要註冊。
- 屬性和方法都要在
setup 函式中返回,有的時候僅一個 return 就十幾行甚至幾十行。 - …
不想寫啊怎麼辦
好辦, Vue3 官方提供了 script setup 語法糖,只需要在 script 標籤中==新增 setup==,元件只需引入不用註冊,屬性和方法也不用返回,setup 函式也不需要,甚至 export default 都不用寫了,不僅是資料、計算屬性和方法,甚至是自定義指令也可以在我們的 template 中自動獲得。
但是這麼過癮的語法糖,還是稍微添加了一點點心智負擔,因為沒有了 setup 函式,那麼 props、emit、attrs 怎麼獲取呢,就要介紹一下新的語法了。
setup script 語法糖提供了三個新的 API 來供我們使用: ==defineProps==、==defineEmit== 和 ==useContext==。
defineProps:用來接收父元件傳來的值 props。defineEmit:用來宣告觸發的事件表。useContext:用來獲取元件上下文 context。
程式碼演示
parent.vue
 1
 2
 3
 4
 5
 6
 7
 8
 9
10
11
12
13
14
| <template>
<div>
<h2>我是父元件!</h2>
<Children msg="hello" @child-click="handleClick" />
</div>
</template>
<script setup>
import Children from './components/children.vue'
const handleClick = (ctx) => {
console.log(ctx)
}
</script>
|
children.vue
 1
 2
 3
 4
 5
 6
 7
 8
 9
10
11
12
13
14
15
16
17
| <template>
<span @click="sonClick">msg: {{ props.msg }}</span>
</template>
<script setup>
import { useContext, defineProps, defineEmit } from 'vue'
const emit = defineEmit(['child-click'])
const ctx = useContext()
const props = defineProps({
msg: String,
})
const sonClick = () => {
emit('child-click', ctx)
}
</script>
|
我們點選一下子元件:

可以看到 context 被列印了出來,其中的 attrs、emit、slots、expose 屬性和方法依然可以使用。props 也可以輸出在頁面上,事件也成功派發。
其他知識點
接下來介紹一下我使用 Vue3 過程中遇到的問題或者小技巧,不全面,想起什麼就寫什麼吧。
script setup 語法糖的坑
這個很多大佬已經在 Vue3 的 github 上提交 Issues 了,或許會在不久的將來修復,但現在還是要注意一下。
如果在父元件中通過 ref='xxx' 的方法來獲取子元件實例,那麼子元件不可以使用 script setup 語法糖,否則會報錯。
程式碼演示
parent.vue
 1
 2
 3
 4
 5
 6
 7
 8
 9
10
11
12
13
14
| <template>
<div>
<h2>我是父元件!</h2>
<Child ref='son' />
</div>
</template>
<script setup>
import Child from './components/children.vue'
import { ref } from 'vue'
const son = ref(null)
console.log(' ~ son:', son)
</script>
|
子元件先不使用語法糖:
children.vue
 1
 2
 3
 4
 5
 6
 7
 8
 9
10
11
12
13
14
15
16
17
18
| <template>
<div>
我是子元件{{msg}}
</div>
</template>
<script >
import { ref } from 'vue'
export default {
setup() {
const msg = ref('hello')
return {
msg,
}
},
}
|

現在把子元件換成 script setup 語法糖再來試一試:
children.vue
 1
 2
 3
 4
 5
 6
 7
 8
 9
10
11
| <template>
<div>
我是子元件{{msg}}
</div>
</template>
<script setup>
import { ref } from 'vue'
const msg = ref('hello')
</script>
|
可以看到現在是獲取不到子元件定義的 msg 屬性的。

Emit 派發事件可以對引數進行驗證
parent.vue
 1
 2
 3
 4
 5
 6
 7
 8
 9
10
11
12
13
14
15
| <template>
<div>
<h2>我是父元件!</h2>
<Child @sonClick='sonClick' />
</div>
</template>
<script setup>
import Child from './components/Child.vue'
import { ref } from 'vue'
const sonClick = (value) => {
console.log(value)
}
</script>
|
children.vue
 1
 2
 3
 4
 5
 6
 7
 8
 9
10
11
12
13
14
15
16
17
18
19
20
21
22
23
24
25
26
27
28
29
30
31
32
33
34
35
36
| <template>
<div>
我是子元件{{ msg }}
</div>
<button @click="handleClick(1)">我是按鈕1</button>
<button @click="handleClick(2)">我是按鈕2</button>
</template>
<script>
import { ref } from 'vue'
export default {
name: '',
emits: {
sonClick: (value) => {
if (value === 1) {
return true
} else {
return false
}
},
},
setup(props, { emit }) {
const msg = ref('hello')
const handleClick = (value) => {
emit('sonClick', value)
}
return {
msg,
handleClick,
}
},
}
</script>
|
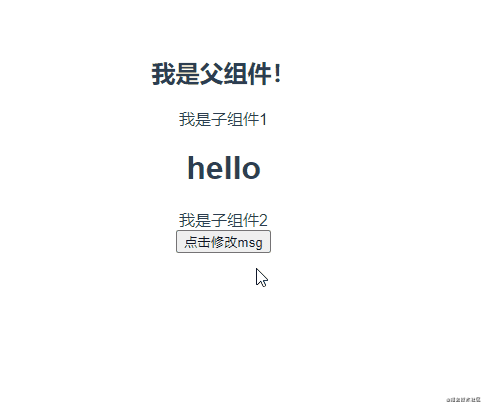
我們分別點一下按鈕1和按鈕2,可以看到當我們點了按鈕2的時候,控制檯會發出警告,但是程式會繼續執行,還沒想到什麼適合的應用場景,但是要知道這個知識點,小夥伴們可以在這搞事情。

跨元件通訊 mitt.js
Vue2 中怎麼實現跨元件通訊呢?很多人第一想法就是 event bus。但是 Vue3 移除了 $on、$once、$off 導致不能使用這個方法。但是 Vue 官方給大家推薦了 ==mitt.js==,它的原理就是 event bus。
mitt.js 教學
程式碼演示
mitt.js
1
2
3
4
| import mitt from 'mitt'
const emitter = mitt();
export default emitter;
|
parent.vue
 1
 2
 3
 4
 5
 6
 7
 8
 9
10
11
12
13
| <template>
<div>
<h2>我是父元件!</h2>
<Child1 />
<Child2 />
</div>
</template>
<script setup>
import Child1 from './components/children1.vue'
import Child2 from './components/children2.vue'
</script>
|
children1
 1
 2
 3
 4
 5
 6
 7
 8
 9
10
11
12
13
14
15
16
17
18
19
20
21
22
23
24
25
26
27
28
29
30
31
32
33
34
| <template>
<div>
我是子元件1
<h1>{{msg}}</h1>
</div>
</template>
<script>
import { ref, onUnmounted } from 'vue'
import emitter from '../mitt'
export default {
name: '',
setup() {
// 初始化
const msg = ref('hello')
const changeMsg = () => {
msg.value = 'world'
}
// 監聽事件,更新資料
emitter.on('change-msg', changeMsg)
// 顯式解除安裝
onUnmounted(() => {
emitter.off('change-msg', changeMsg)
})
return {
msg,
changeMsg,
}
},
}
</script>
|
children2
 1
 2
 3
 4
 5
 6
 7
 8
 9
10
11
12
13
14
15
16
17
18
19
20
21
22
23
24
25
| <template>
<div>
我是子元件2
</div>
<button @click='changeMsg'>點選修改msg</button>
</template>
<script>
import { ref } from 'vue'
import emitter from '../mitt'
export default {
name: '',
setup() {
const changeMsg = () => {
emitter.emit('change-msg')
}
return {
changeMsg,
}
},
}
</script>
|
演示
自定義指令
先看看 Vue2 自定義指令的鉤子:
bind:當指令繫結在對應元素時觸發,只會觸發一次。inserted:當對應元素被插入到 DOM 的父元素時觸發。update:當元素更新時,這個鉤子會被觸發(此時元素的後代元素還沒有觸發更新)。componentUpdated:當整個元件(包括子元件)完成更新後,這個鉤子觸發。unbind:當指令被從元素上移除時,這個鉤子會被觸發,也只觸發一次。
在 Vue3 中,官方為了更有助於程式碼的可讀性和風格統一,把自定義指令的鉤子名稱改的更像是元件生命週期,儘管他們是兩回事:
bind => beforeMount。inserted => mounted。beforeUpdate:新的鉤子,會在元素自身更新前觸發。update => 移除!componentUpdated => updated。beforeUnmount:新的鉤子,當元素自身被解除安裝前觸發。unbind => unmounted。
過渡動畫
這個沒有什麼大的改動,只是修改了兩個 class 名字,正是因為沒有什麼大的改動,導致我曾經在這裡栽了大跟頭,寫完了怎麼都不對,後來查官網才知道。
以下是直接引用官網的原文:
v-enter-from:定義進入過渡的開始狀態。在元素被插入之前生效,在元素被插入之後的下一幀移除。v-enter-active:定義進入過渡生效時的狀態。在整個進入過渡的階段中應用,在元素被插入之前生效,在過渡/動畫完成之後移除。這個類可以被用來定義進入過渡的過程時間,延遲和曲線函式。v-enter-to:定義進入過渡的結束狀態。在元素被插入之後下一幀生效 (與此同時 v-enter-from 被移除),在過渡/動畫完成之後移除。v-leave-from:定義離開過渡的開始狀態。在離開過渡被觸發時立刻生效,下一幀被移除。v-leave-active:定義離開過渡生效時的狀態。在整個離開過渡的階段中應用,在離開過渡被觸發時立刻生效,在過渡/動畫完成之後移除。這個類可以被用來定義離開過渡的過程時間,延遲和曲線函式。v-leave-to:離開過渡的結束狀態。在離開過渡被觸發之後下一幀生效 (與此同時 v-leave-from 被刪除),在過渡/動畫完成之後移除。
特別注意的是:
v-enter 改成了 v-enter-form
v-leave 改成了 v-leave-from
其他小知識
Vue3 移除了 filter。- 獲取元件實例的方法
getCurrentInstance():
這個方法可以獲取到當前元件的實例,相當於 Vue2 中的 this,但是它只在==開發環境==起效果,打包以後會報錯,所以大家不要依賴 getCurrentInstance 方法去獲取元件實例來完成一些主要功能。
更詳細的可以檢視下面這篇文章:
關於Vue3獲取當前元件例項的 getCurrentInstance 方法的補充
最後,畢竟是個人總結,難免會出現紕漏和錯誤,期待各路大神的補充和糾正。
參考
